[CS231n review] Lecture5 - Convolutional Neural Networks
Stanford CS231n(2017)를 학습하며 정리 및 추가한 내용입니다.

Convolutional Neural Networks
Convolve the filter with the image i.e. “slide over the image spatially computing dot product”
왜 convolution neural network를 써야하는가?
Artificial Neural Network로 이미지 분석 처리를 하면 파라미터가 상당히 커져 모델이 복잡해지고 overfitting 문제가 일어날 수 있다.
반면 CNNs는 이를 해결하는데, 그 중 첫번째 이유는 Artificial Neural Network와 달리, 텐서형태로 받으면 텐서형태로 활용한다.
또한 parameter가 과도한 문제는 Local Connectivity와 Parameter sharing으로 해결한다.
Local Connectivity : 어떤 이미지가 주어지면, 그 이미지의 어떤 구역을 node 하나가 감당하는 것

112x150x3을 예시로 이를 계산하면 아래와 같다.
receptive filed (filter size) : 35
Fully-connected : 112 x 150 x 3 = 50,400
Local connectivity : 35 x 35 x 3 = 3,675
위에서 확인된 것과 같이, 상당히 연산량이 적어진 것을 알 수 있다. 그러나 node의 개수가 늘어날 수록 3,675개만큼 증가하므로 완전히 해결하지는 못한다.
이를 Parameter sharing 으로 해결할 수 있다.
parameter sharing : 만약 한 feature이 어떤 구역에 의미가 있다면, 다른 구역에도 의미가 있다고 가정
If detecting a horizontal edge is important at some location in the image, it should intultively be useful at some other location as well due to the translationally-invariant structure of images.
위 두 기법을 통해 parameter을 상당히 줄일 수 있다.
convolution ? : 하나의 함수와 또 다른 함수를 반전 이동한 값을 곱한 다음, 구간에 대해 적분하여 새로운 함수를 구하는 수학 연산자
filter : parameter를 생각하면 된다.(weight)
filter 가 Image를 Convolve한다.
depth가 동일하여야 convolve 할 수 있다.
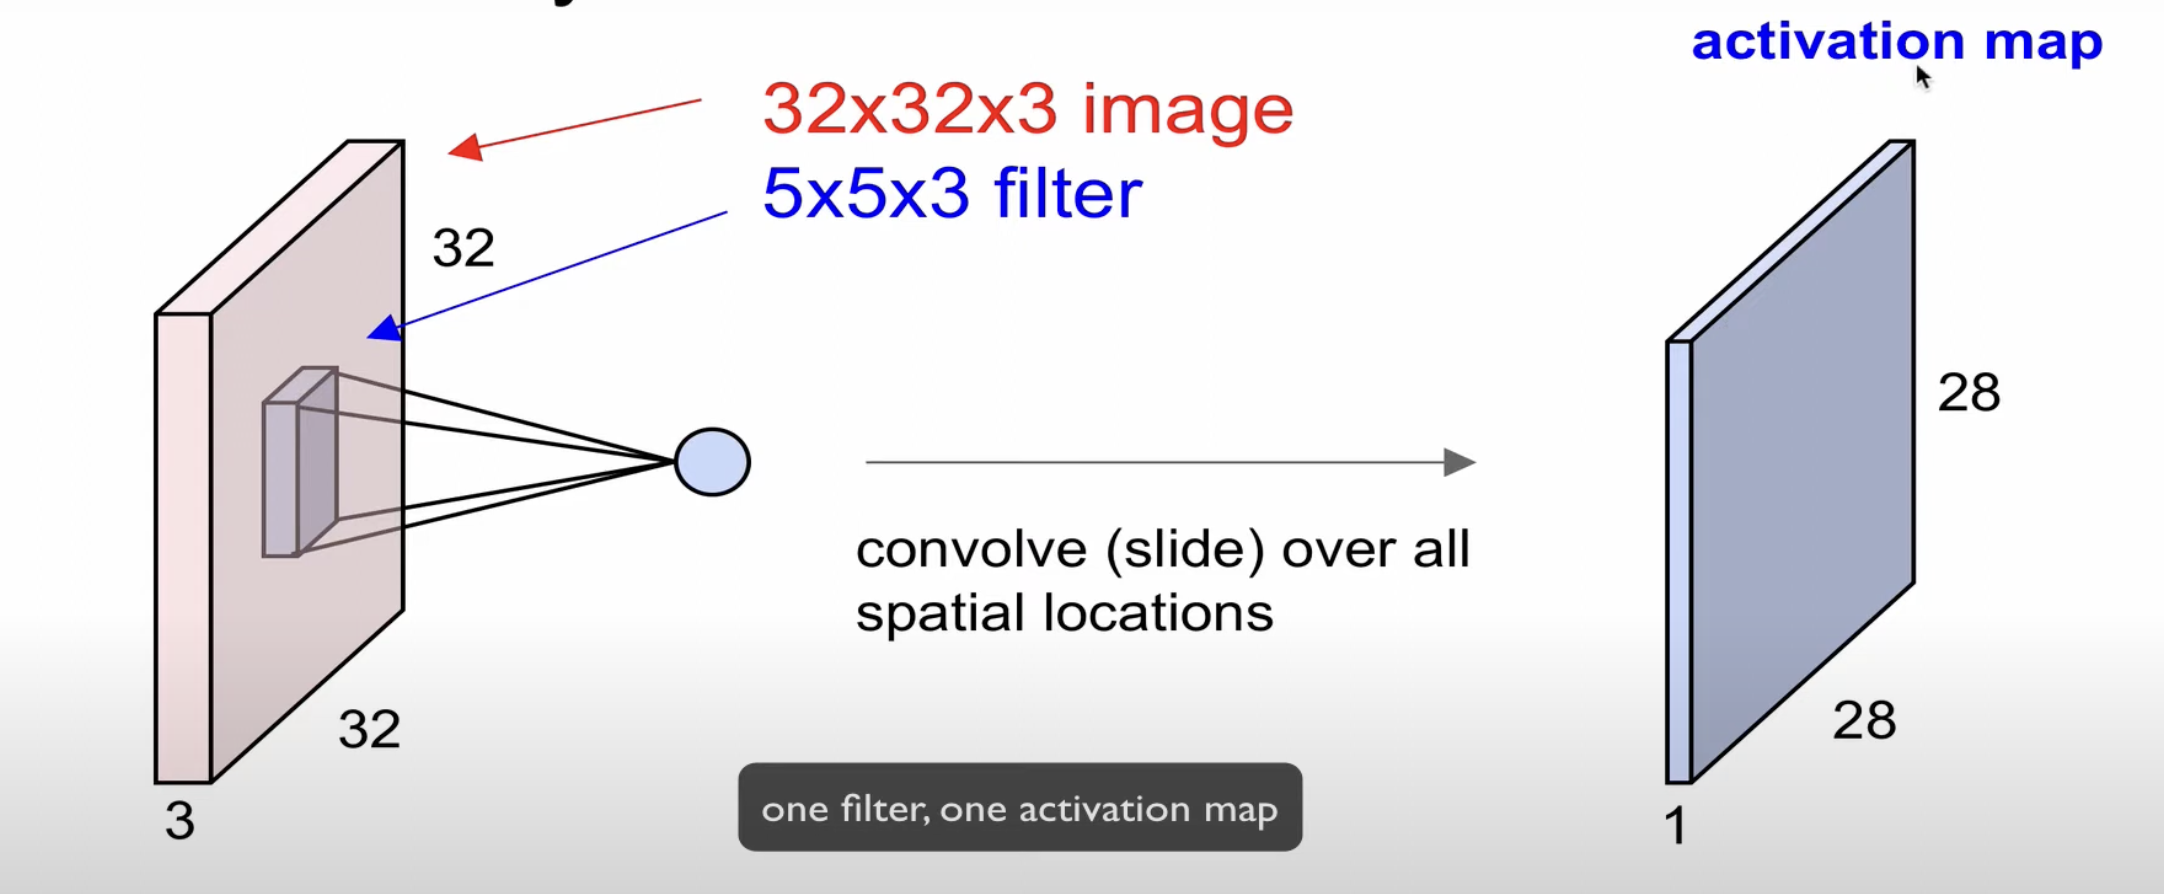
convolve하면 하나의 scalar로 계산된다. 한 이미지 전체를 convolve하게되면 activation map을 형성하게 된다.
image 와 filter의 depth 는 같고, 한 filter는 하나의 activation map을 생성한다.
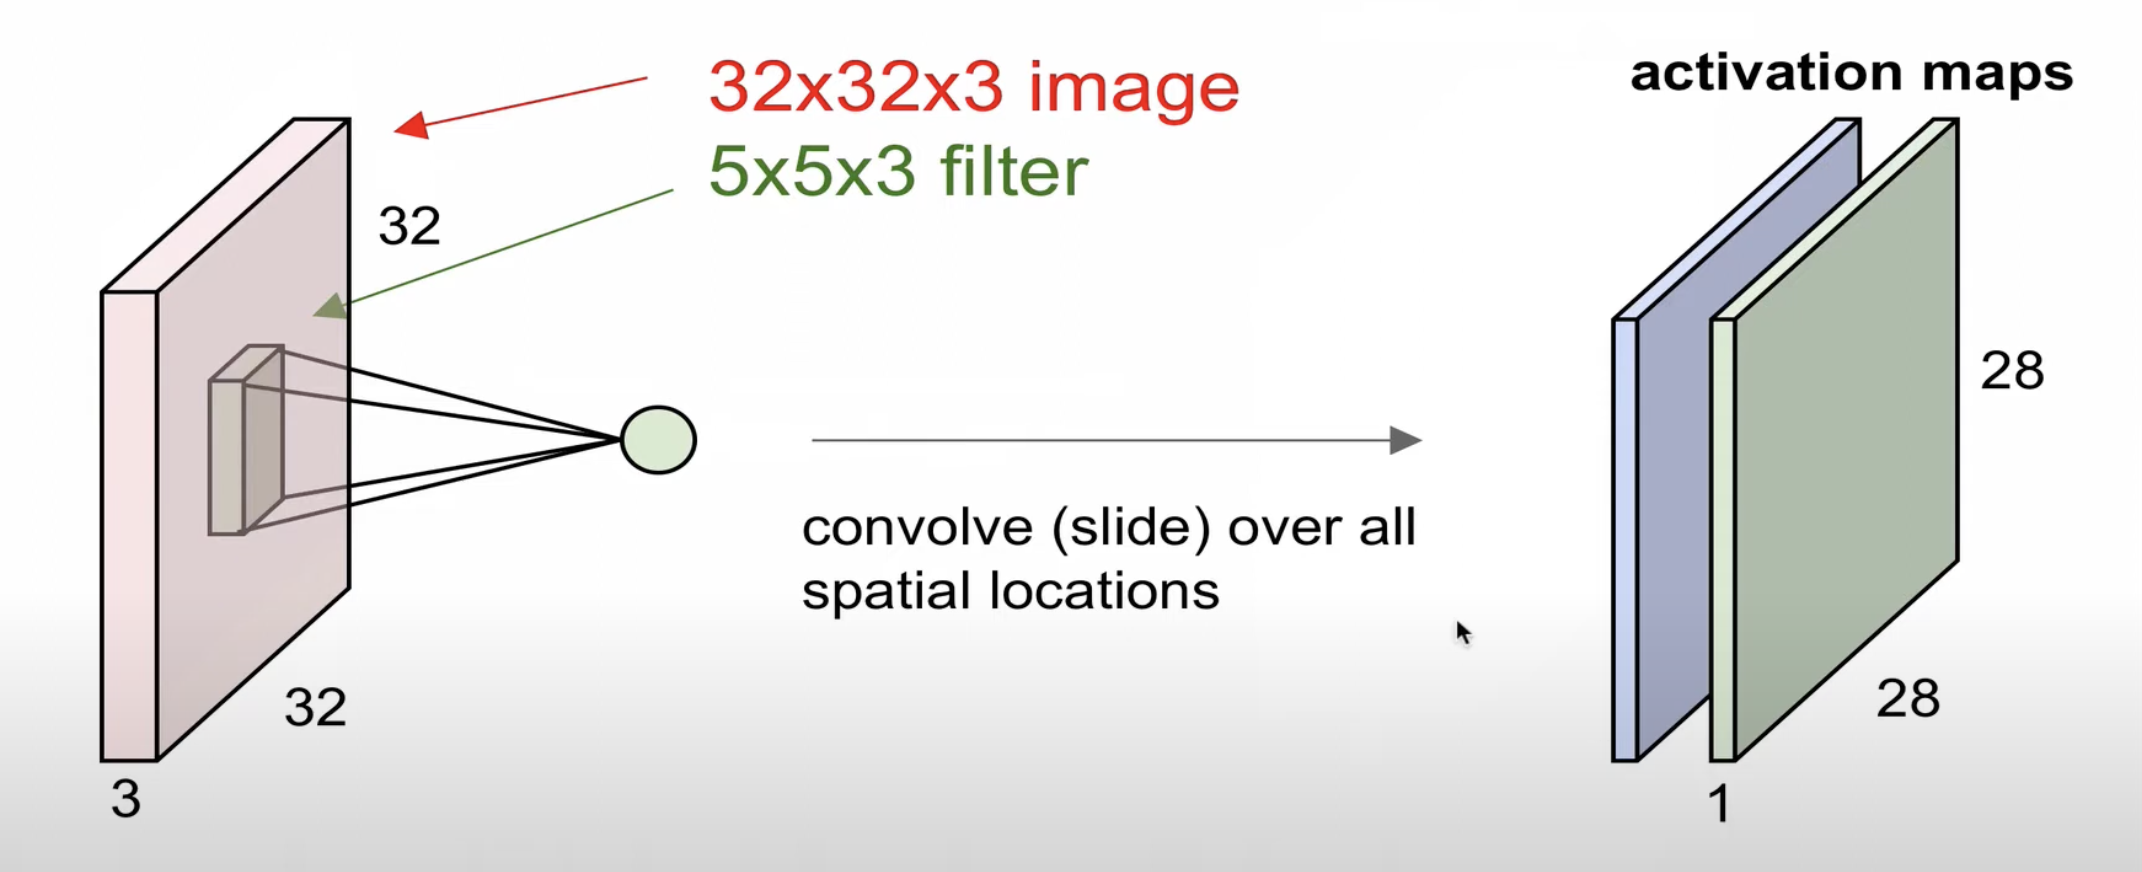
두번째 filter는 또다른 activation map을 생성한다.
마찬가지로, n개의 필터로 n개의 activation map을 생성한다.
위의 예시에서는 $28 \times 28 \times n$을 re-representation한다.
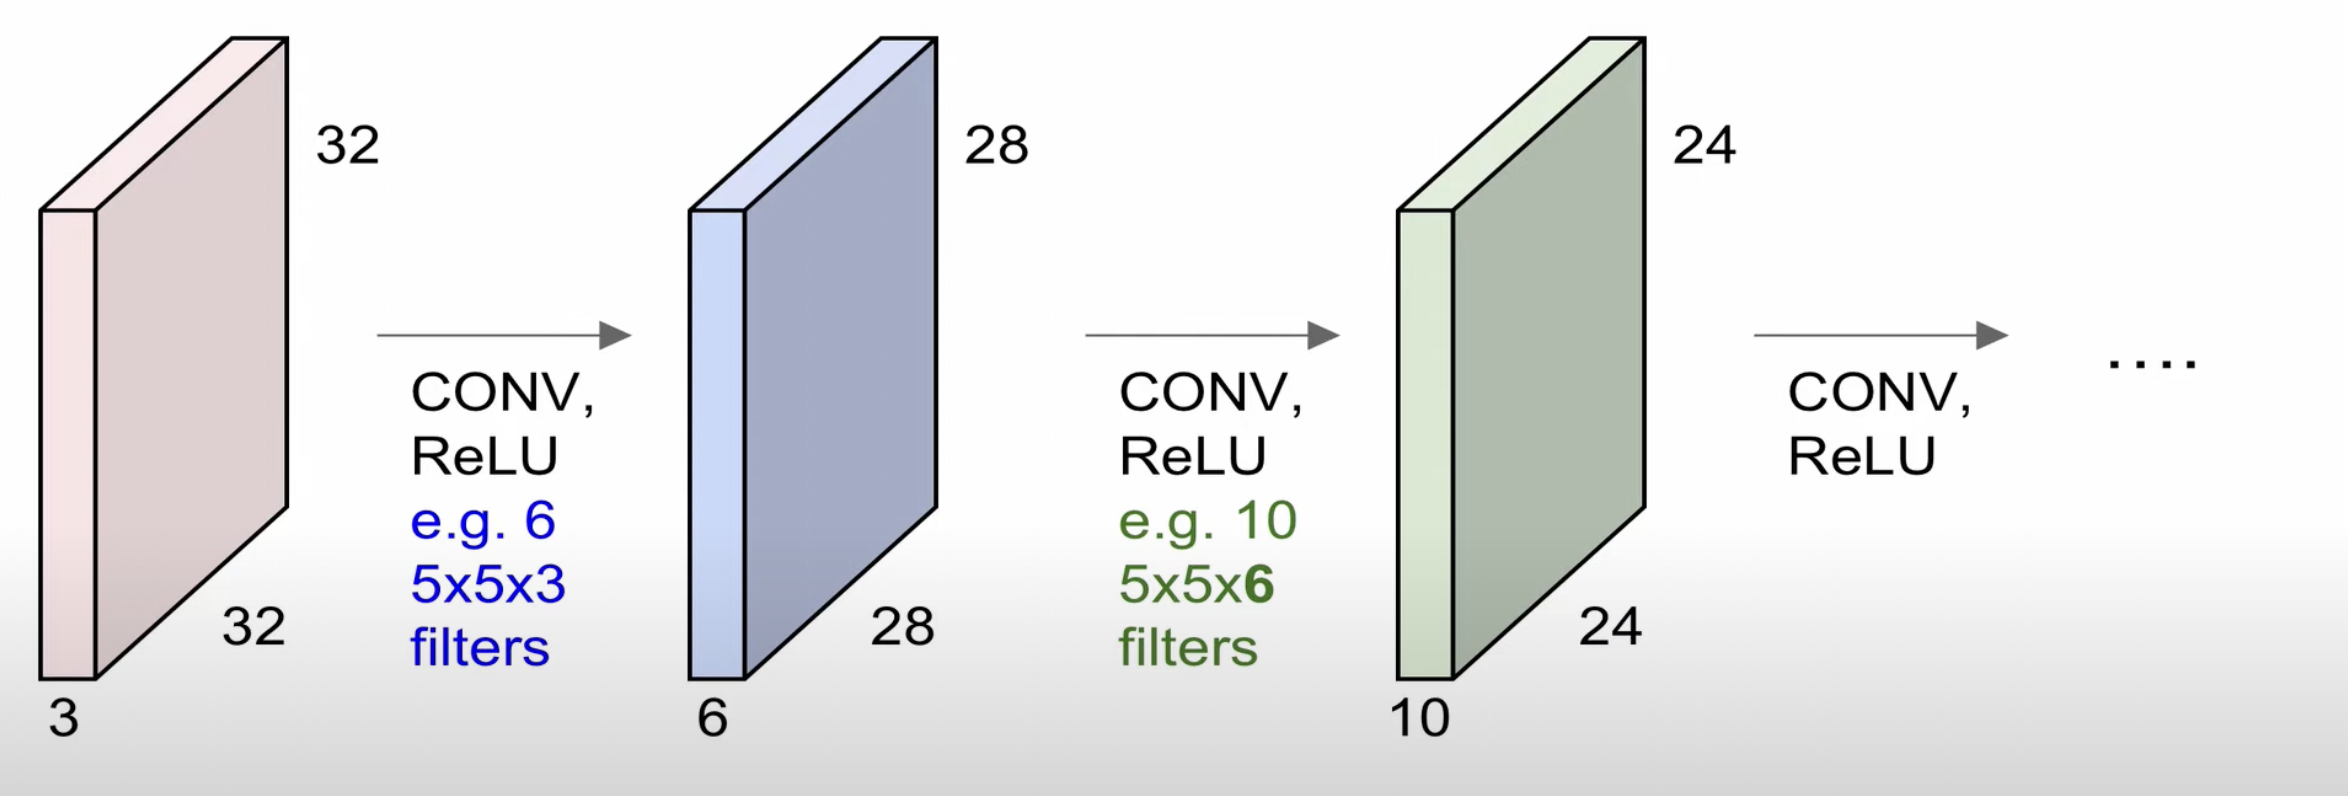
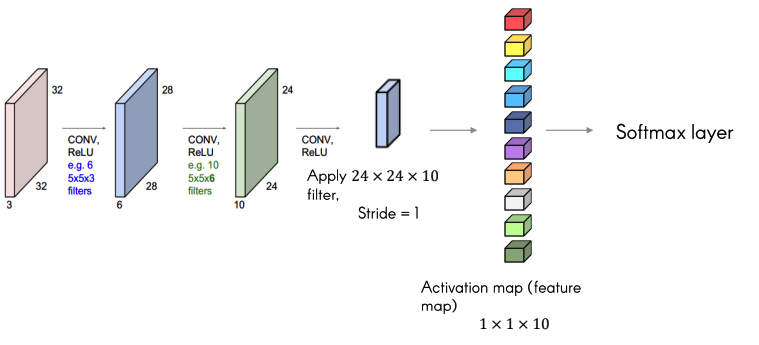
이를 연속적으로 한다면 위와 같이 형성된다.
6개의 $5\times5\times3$의 필터로 $28 \times 28 \times 1$ 사이즈의 $28 \times 28\times 6$ activation maps를 형성할 수 있고, 이를 다시 10개의 $5\times5\times6$ 필터로 $24\times24\times10$ activation map를 생성할 수 있다.
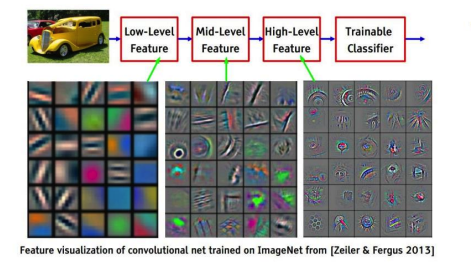
위처럼 Convolution Layer를 여러개 이어 붙혀 사용할 수 있는데, 이 Convolutional Layer가 깊어질수록 더 복잡하고, 정교한 특징을 얻는다.
update해야할 parameter의 대상은 filter이다.
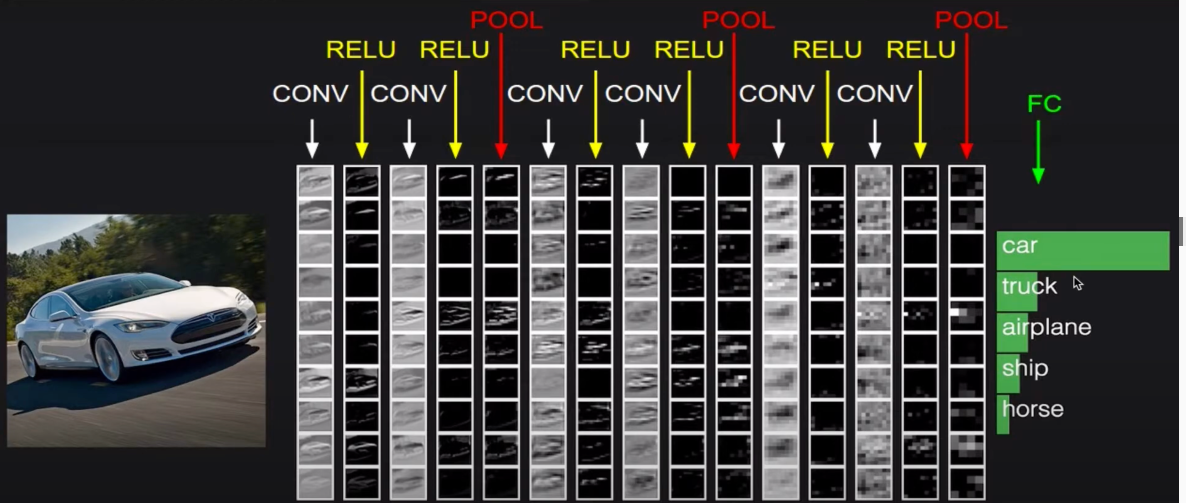
위처럼, CONV, ReLU, Pool를 반복적으로 진행하고, 마지막에 FC layer로 class의 score을 계산합니다.
Convolution Layer Strider
Stride : filter가 image를 슬라이딩할 때 움직이는 step의 크기
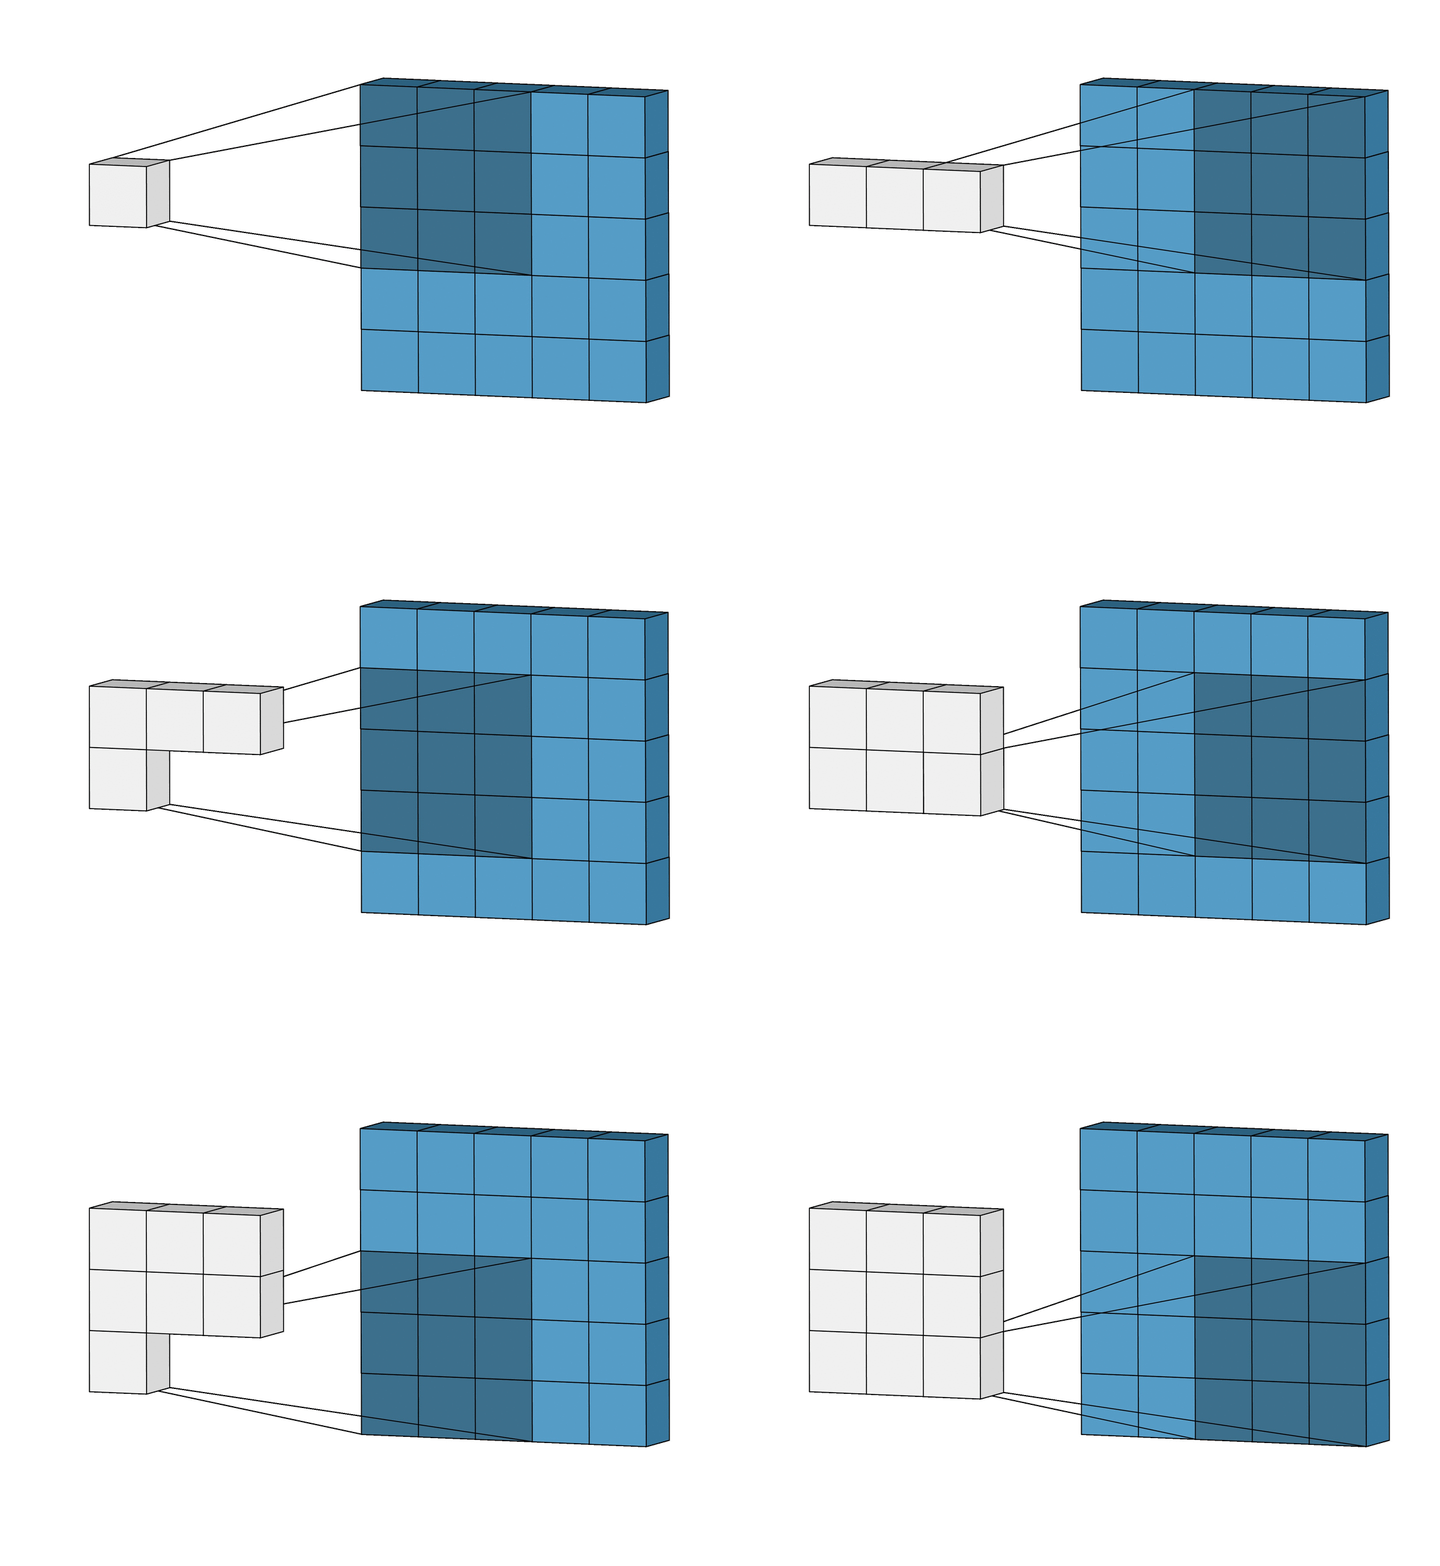
위는 stride 크기가 1인 경우이고
아래는 stride 크기가 2인 경우를 보여준다.

Output의 size를 공식화 할 수 있는데 $(N(image\ width) - F(filter\ width)) / stride + 1$이다.
stride가 input image에 맞지않으면 불균형한 결과를 부를 수 있다.
예를 들어, stride가 3이고, input image size가 7x7이고, filter size가 3x3일 때, output size는 2.33이 나오게 된다.
Convolutional Layer Pad
위에서 본 것과 같이 Convolutional Layer은 Filter 크기에 따라 width와 height가 줄어드는데, 만약 Convolution Layer가 여러 층이라면 image의 크기가 점점 줄어드는 문제가 있다.
Convolutional Layer Pad는 원본 크기를 유지하며, image의 외곽이 덜 계산되는 것을 방지한다.
0으로 채운다면 Zero-padding이라고 한다.

Convolution Layer Output Size
W: input image widthF: Filter widthS: StrideP: PadOutput W:(W - F + 2*P)/S + 1
Example : Input volume : 32x 32x 3, 10 5x5x3 filter with stride1 , pad 2
- –> Output volume size : (32+2x2-5)/1 + 1=32, so 32x32x10
- –> Number of parameters in this layer?
각각의 filter에는 5x5x3의 75개와 bias까지해서 76개의 parameter가 존재한다.
필터가 총 10개이므로 parameter는 총 760개가 존재한다.
1x1 Convolution Layer
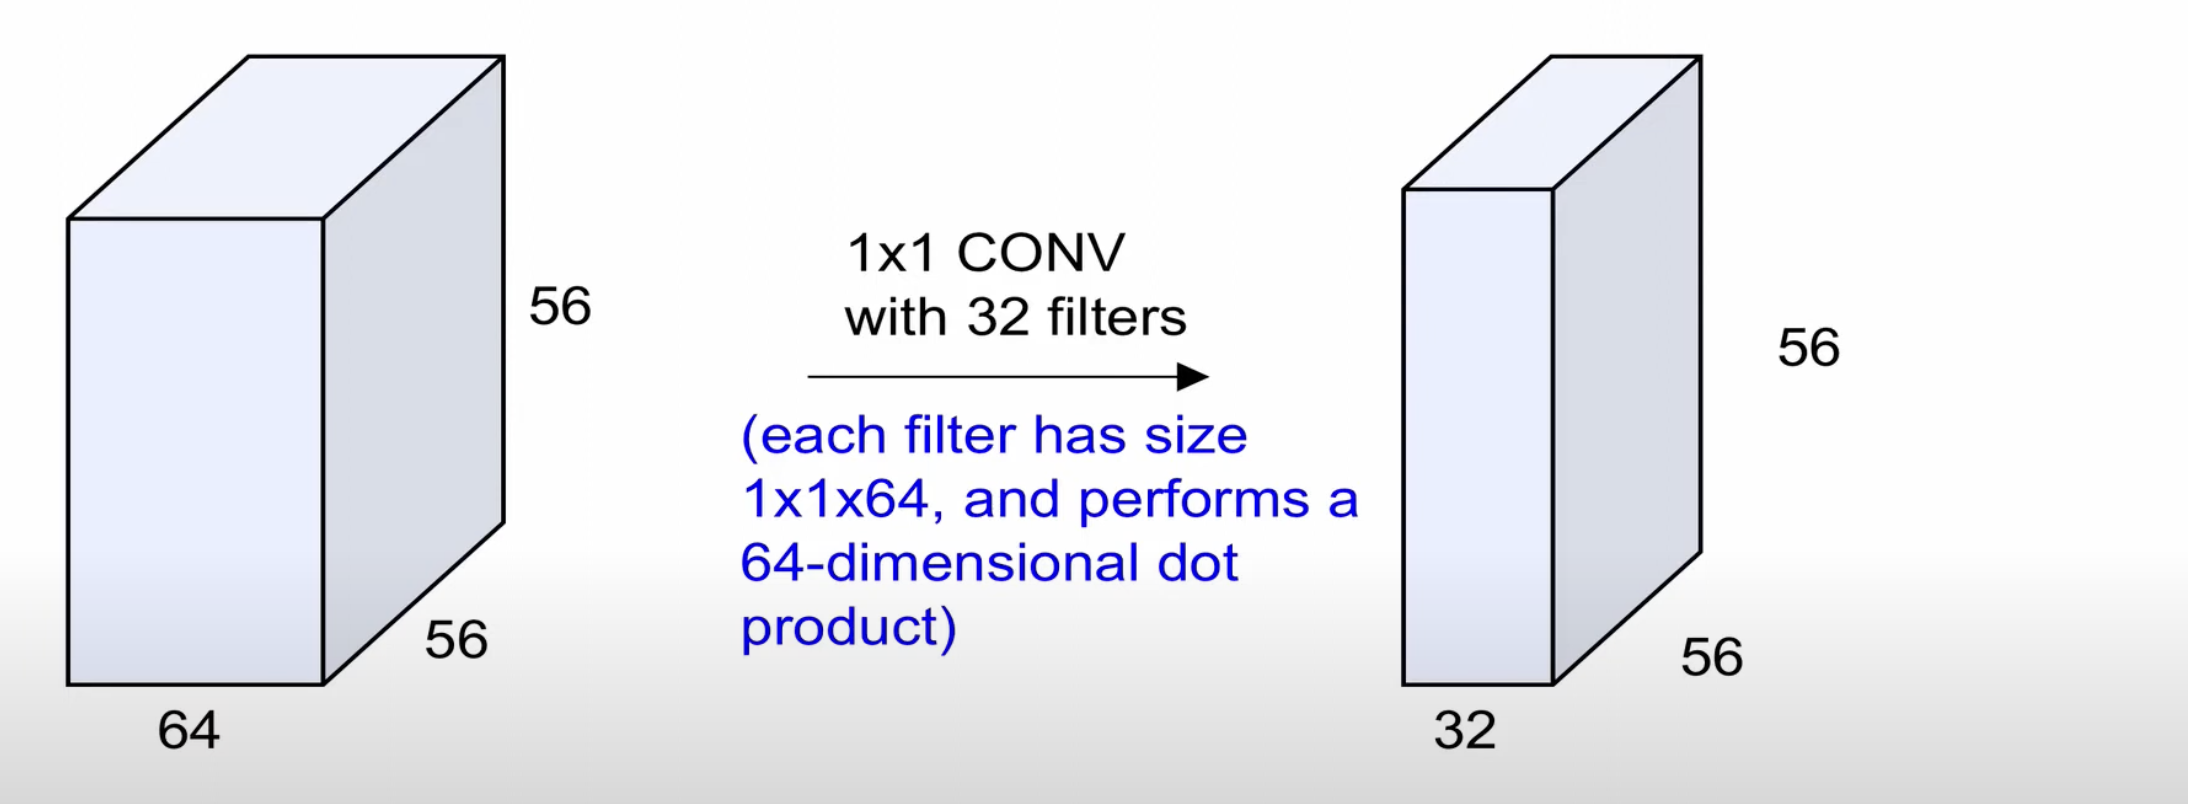
1x1 convolution 도 의미가 있는데, 그 이유는 3차원이기 때문이다.
Convolution Layer의 특징
Activation map
- Each is connected to small region in the input
- All of them share parameters (parameter sharing)
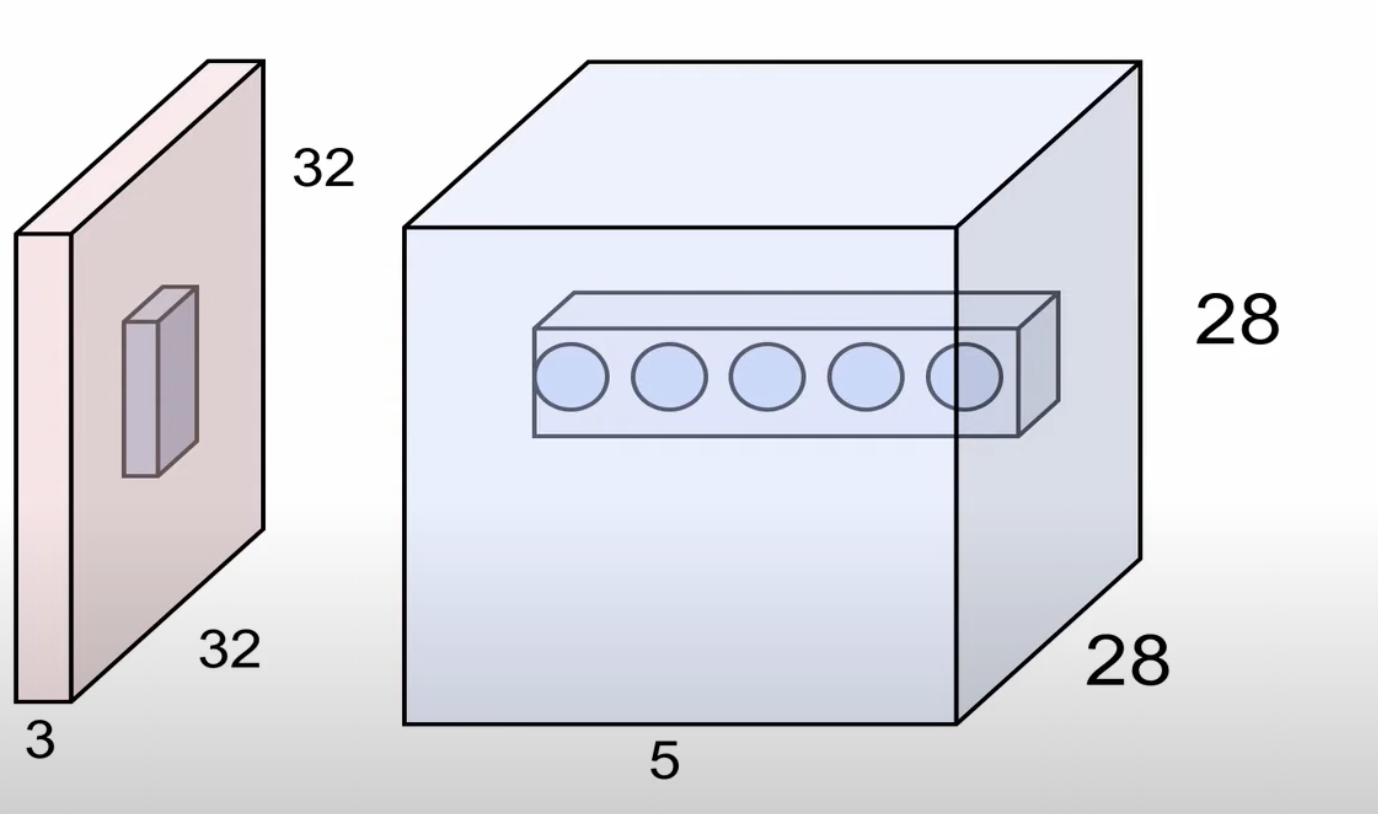
위와 같이 activation maps의 같은 위치에 있는 뉴런들은 input image의 동일한 위치를 바라보고, 각각 다른 weight를 가진다.(weight를 공유하지 않는다.) <-> 동일한 depth : parameter sharing
Pooling layer
- make the representations smaller and more manageable
- operates over each activation map independently
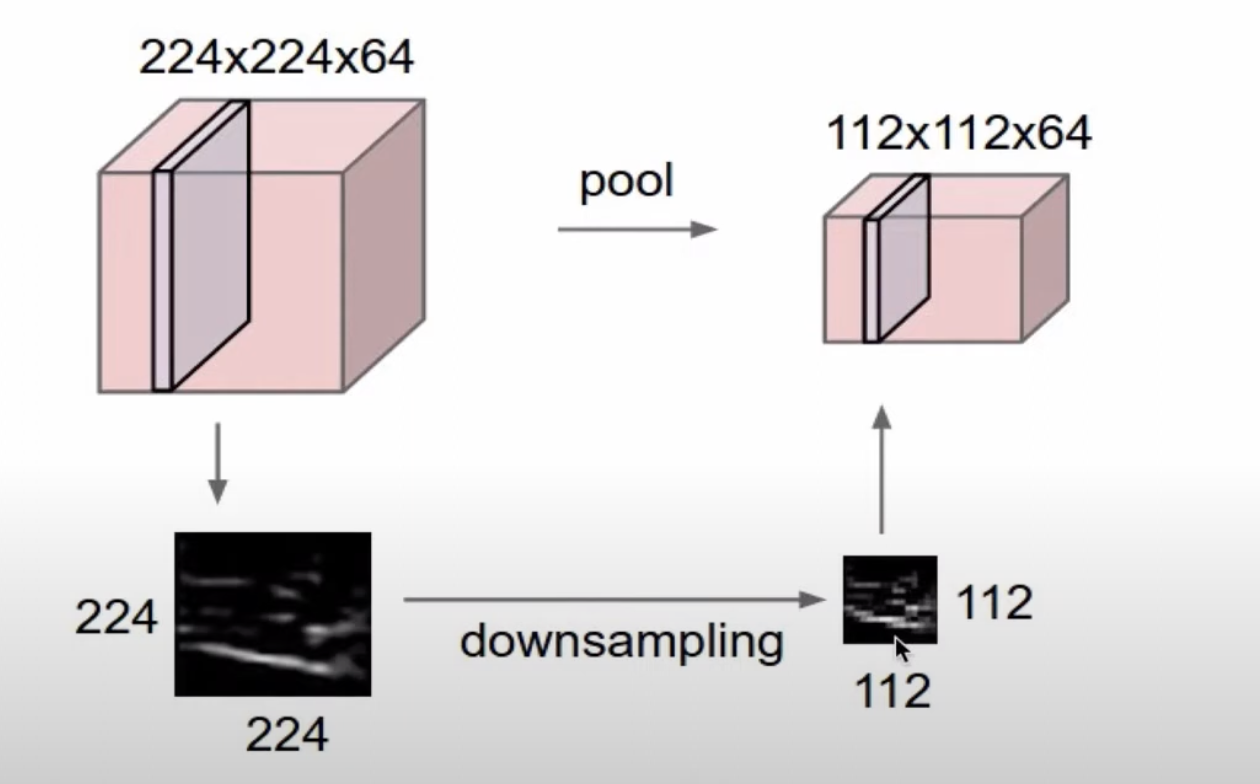
activation map의 크기를 downsampling 하는 과정(이미지의 크기를 줄이는 과정, depth를 유지하면서 width와 height를 줄임)
convolution layer의 깊이가 깊어질수록 많은 계산 양을 요구하므로, pooling layer를 통해 이미지의 크기를 줄여 속도를 높일 수 있다.
Pooling layer를 통해 오히려, 내가 찾고 싶은 정보를 더 잘 찾을 수 있게 representation한다고 볼 수도 있다.
Max pooling
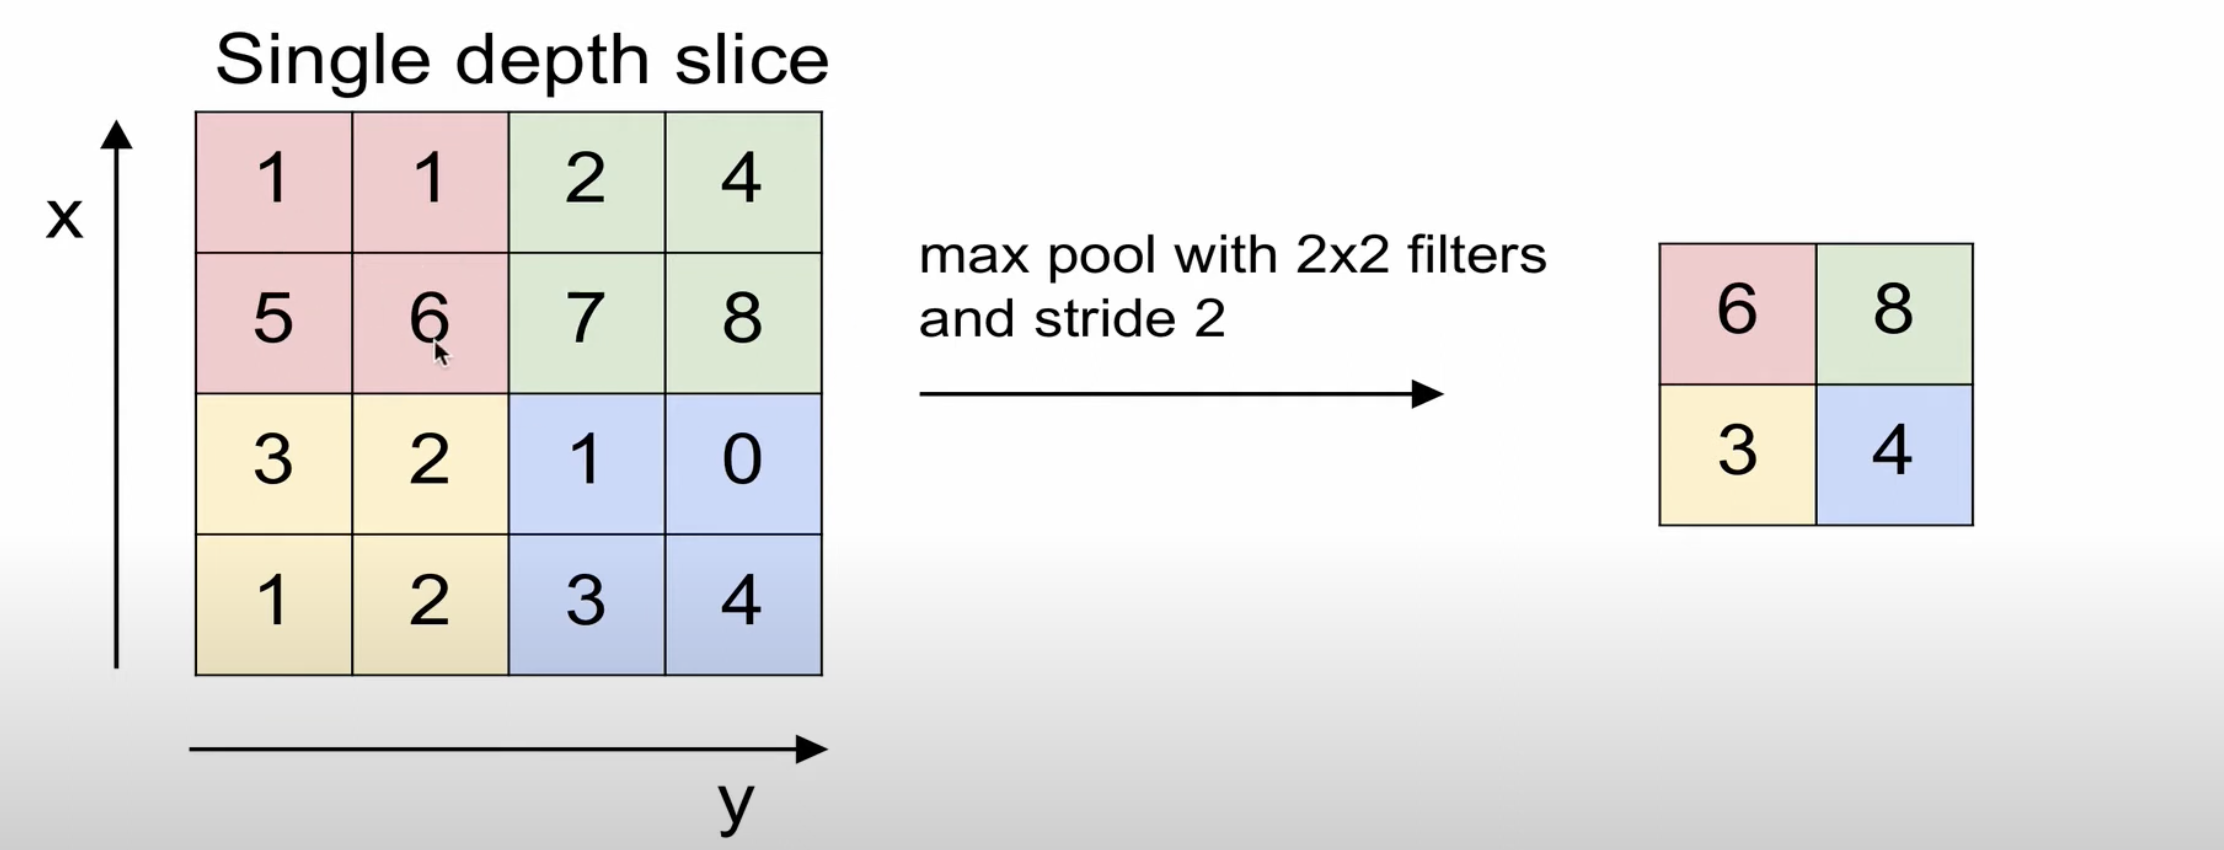
가장 큰 값을 추출하는 방식이다.
해상도를 2배로 줄일 때 가장 잘 보이는 성분을 남기는 것과 같다.
(약간의 정보를 손실하면서 invariance한 능력을 가진다.)
Normalization layer

최근에는 batch normalization technique를 이용한다.
미꾸라지 -> 비누라지 -> 비누단지 -> 비누다시와 같이, 학습이 진행되면서 node 값의 분포가 달라는 문제점을 Internal covariate shift problem 이라 하는데 이를 해결한 technique이 batch normalization technique이다.
Fully Connected Layer(FC layer)
Cone layer의 출력은 3차원 volume으로 이뤄지는데, 이를 전부 펴서 1차원 벡터로 만들어 FC Layer의 입력으로 사용한다.
이는 Convnet의 모든 출력을 서로 연결하게 되는 것이다.(마지막 layer에서는 공간적 구조를 신경쓰지 않아도 된다.)
이를 통해 최종적으로 각 class 별로 score가 출력으로 나온다.
위를 정리한다면 아래와 같다.
Case Study
- LeNet-5
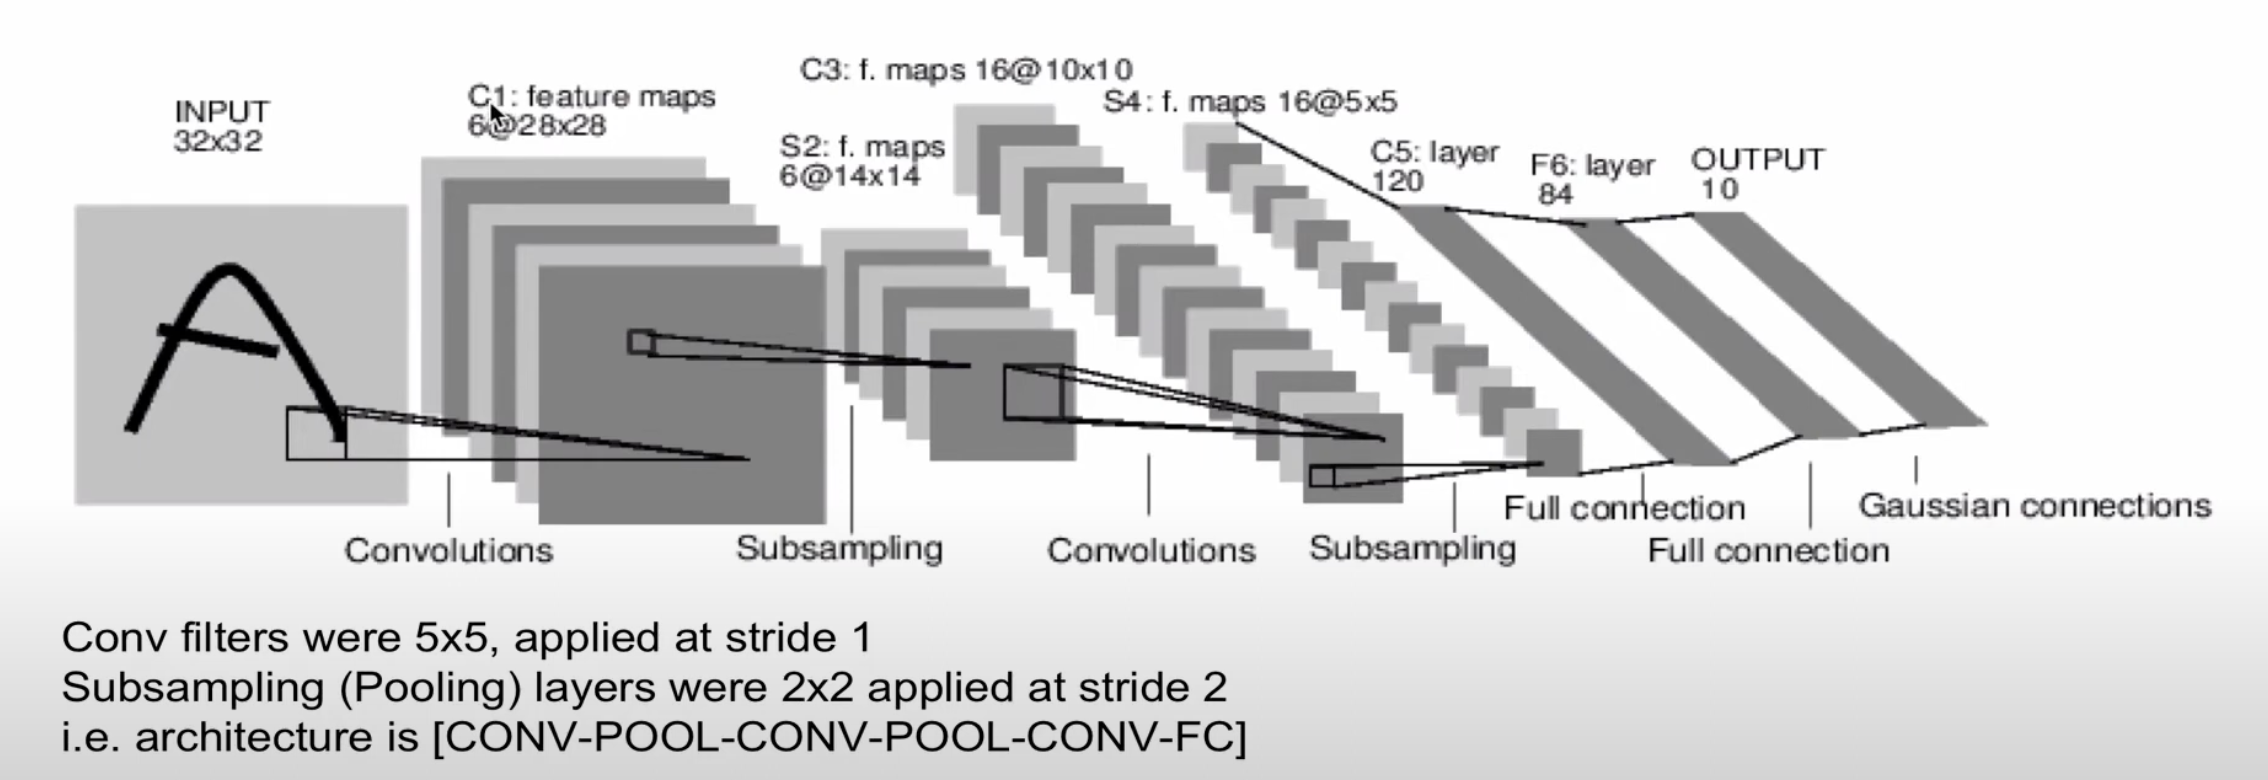
C : convolution, S : subsampling(fooling)
1990년대에 활용된 기술로, 현재의 CNNs의 구조와 매우 유사하다는 것이 특징이다.
- AlexNet
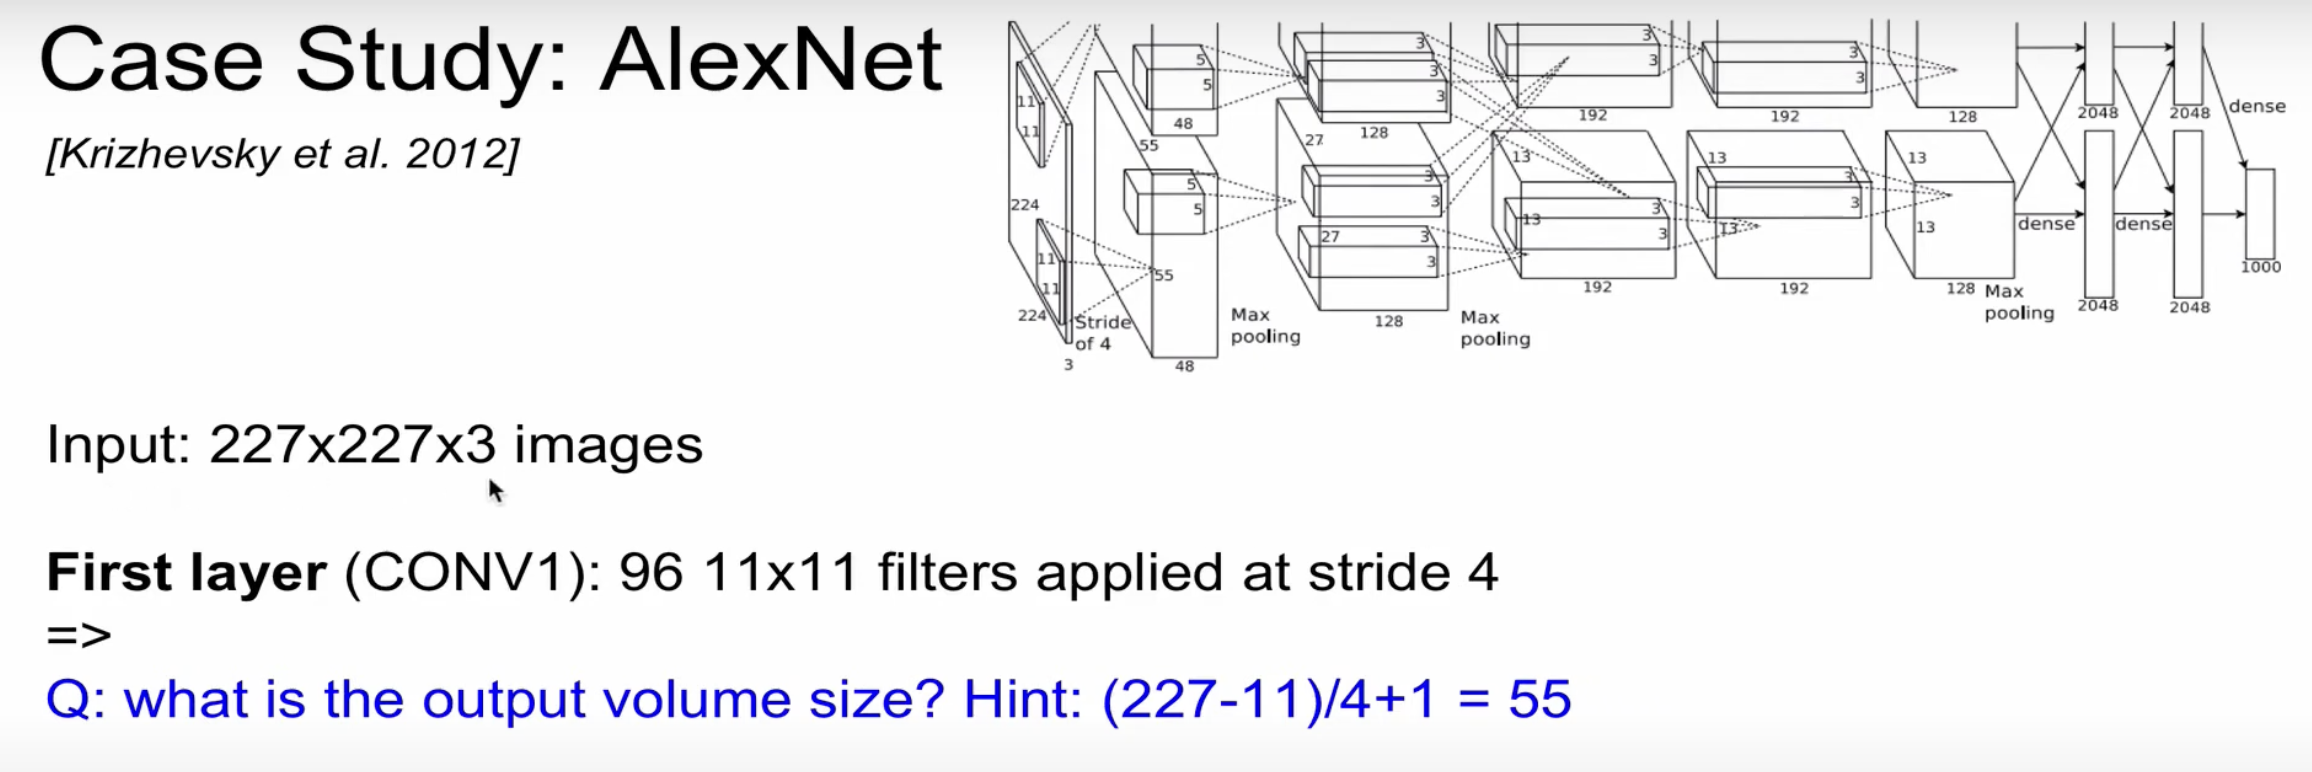
AlexNet으로 딥러닝에 혁명이 일어났다. AlexNet으로 인해 이후 이미지 인식에서 CNNs를 기반으로 연구됐다.
두개의 별도의 stream을 이용하는데, 그 이유는 그 당시의 GPU의 성능을 최대화 하기위해(최근에는 그냥 하나로 돌림)
Output volume : 55x55x96
Parameter : (11x11x3)x96 = 35K
Second layer: (Pool1) : 3x3 filter applied at stride 2
Q. What is the output volume size?
A. (55-3)/2 + 1 = 27 –> 27x27x96
parameter : 0 !(pooling layer에는 parameter가 없다.)
결국 계산하면 아래와 같은데, 이때 Normalization layer은 현재에는 거의 사용하지 않는다.
FC7 layer는 classifier 직전에 있는 layer를 일반적으로 칭한다.
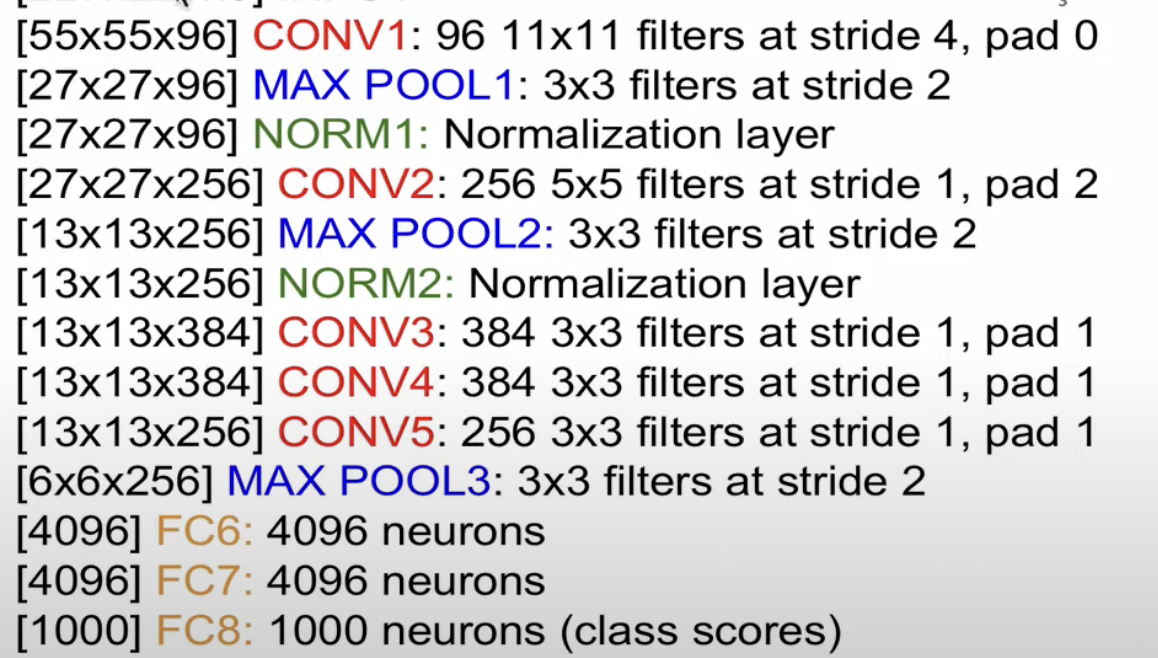
-
AlexNet 특징
- AlexNet에서 처음으로 ReLU를 사용했다.
- Normalization layer를 사용
- Data augmentation을 많이 사용
- LeNet-5와 구조적으로 큰 차이는 없지만, 기술의 발전으로 인해 혁명이 일어났다고 볼 수 있음
- 7 CNN ensemble
아래는 개괄적인 AlexNet의 코드이다.
import torch
import torch.nn as nn

class AlexNet(nn.Module):
    def __init__(self, num_classes=1000):
        super(AlexNet, self).__init__()
        # 합성곱 계층 정의
        self.features = nn.Sequential(
            nn.Conv2d(3, 64, kernel_size=11, stride=4, padding=2), # 첫 번째 합성곱 계층
            nn.ReLU(inplace=True), # 활성화 함수
            nn.MaxPool2d(kernel_size=3, stride=2), # 최대 풀링
            nn.Conv2d(64, 192, kernel_size=5, padding=2), # 두 번째 합성곱 계층
            nn.ReLU(inplace=True),
            nn.MaxPool2d(kernel_size=3, stride=2),
            nn.Conv2d(192, 384, kernel_size=3, padding=1), # 세 번째 합성곱 계층
            nn.ReLU(inplace=True),
            nn.Conv2d(384, 256, kernel_size=3, padding=1), # 네 번째 합성곱 계층
            nn.ReLU(inplace=True),
            nn.Conv2d(256, 256, kernel_size=3, padding=1), # 다섯 번째 합성곱 계층
            nn.ReLU(inplace=True),
            nn.MaxPool2d(kernel_size=3, stride=2),
        )
        self.avgpool = nn.AdaptiveAvgPool2d((6, 6)) # 적응형 평균 풀링
        # 완전 연결 계층 정의
        self.classifier = nn.Sequential(
            nn.Dropout(), # 드롭아웃을 사용하여 과적합 방지
            nn.Linear(256 * 6 * 6, 4096), # 첫 번째 완전 연결 계층
            nn.ReLU(inplace=True),
            nn.Dropout(),
            nn.Linear(4096, 4096), # 두 번째 완전 연결 계층
            nn.ReLU(inplace=True),
            nn.Linear(4096, num_classes), # 출력 계층
        )

    def forward(self, x):
        # 입력 데이터를 합성곱 계층을 통해 전달
        x = self.features(x)
        x = self.avgpool(x)
        # 데이터를 1차원으로 변환
        x = torch.flatten(x, 1)
        # 완전 연결 계층을 통해 전달
        x = self.classifier(x)
        return x
- ZFNet
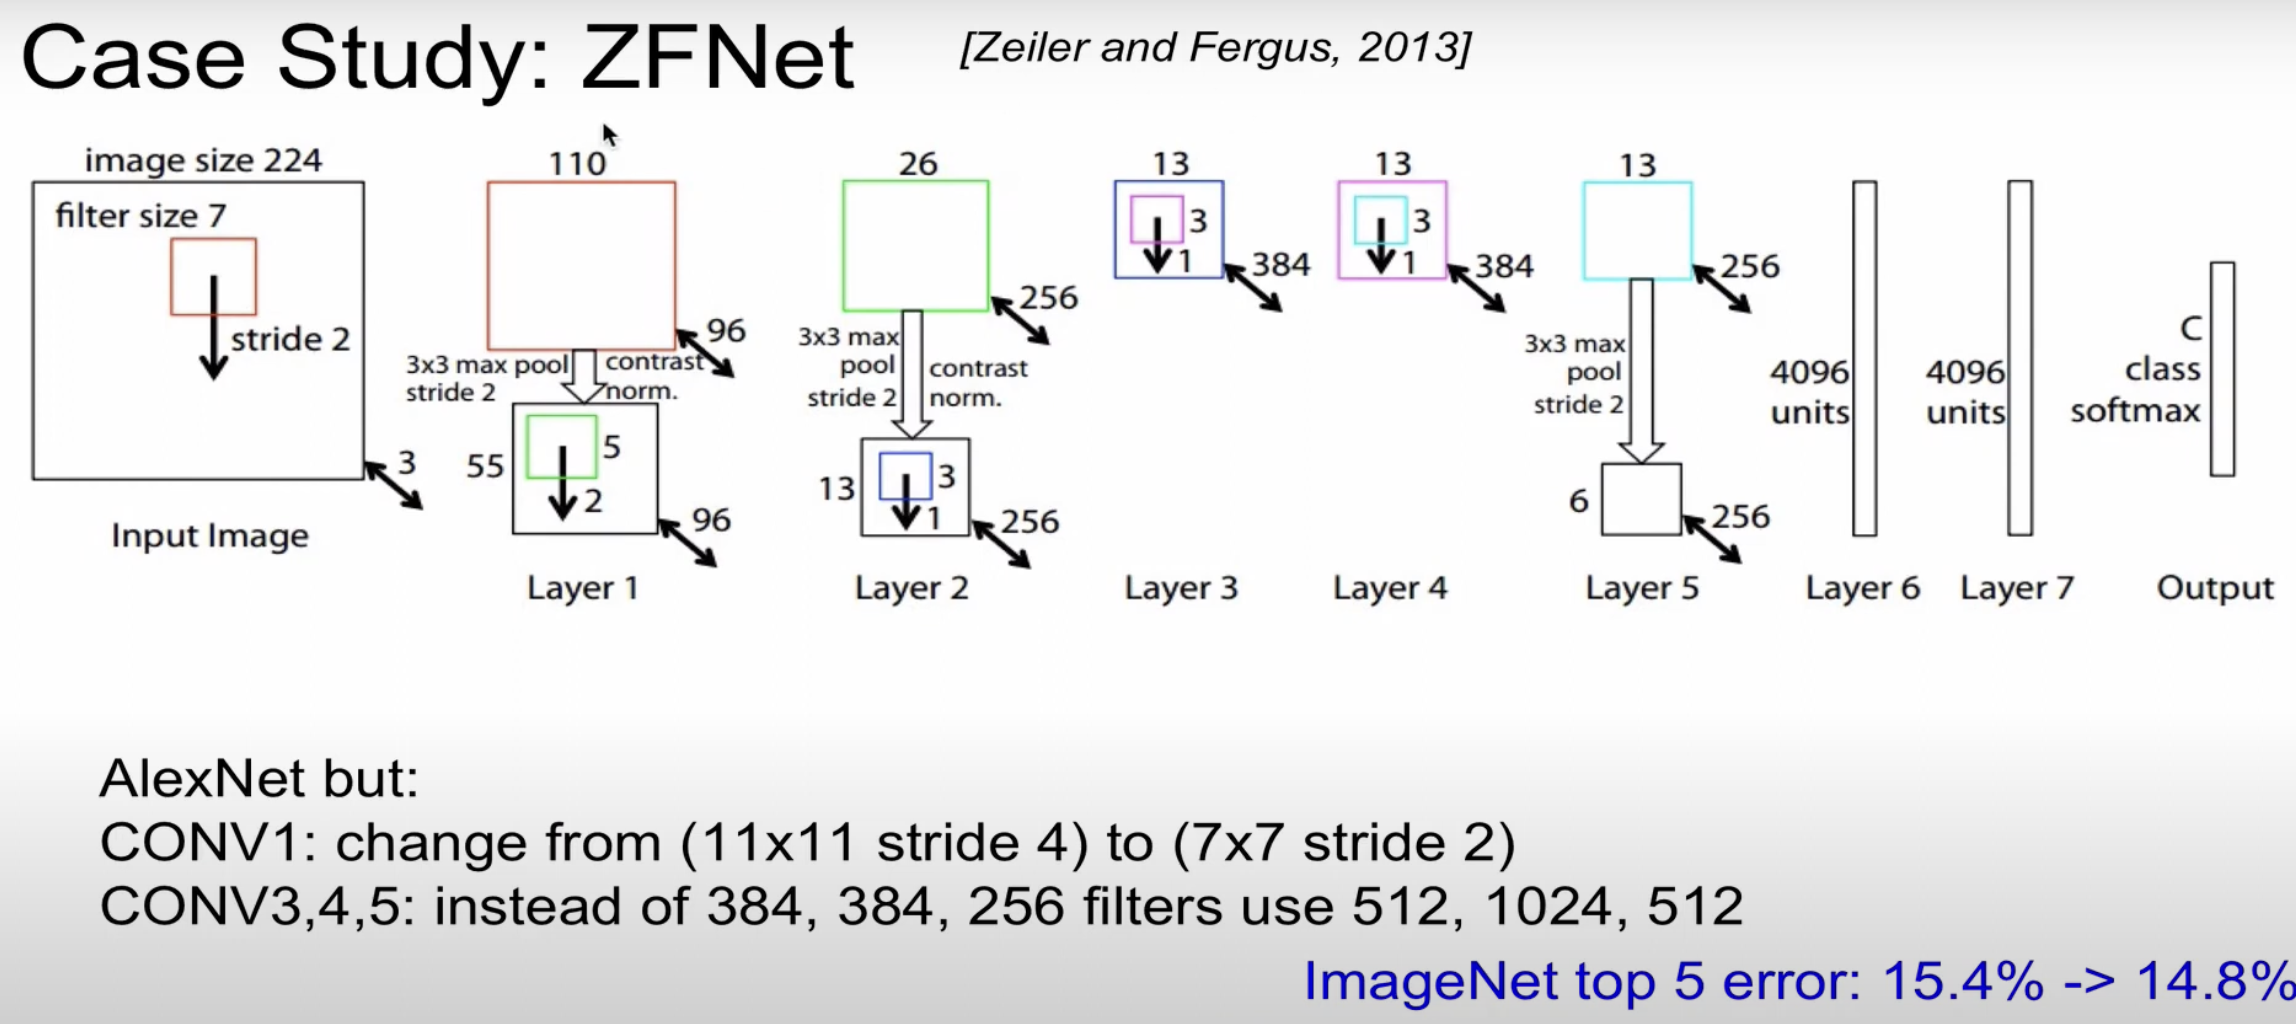
AlexNet과 거의 유사(parameter을 변경)
CONV1 : filter size를 변경(줄임), CONV3,4,5의 filter 수를 늘림
- VGGNet
VGGNet는, 어떤 ConvNN이 depth가 깊어지면 성능이 좋아지는 것을 보여준 모델이다.
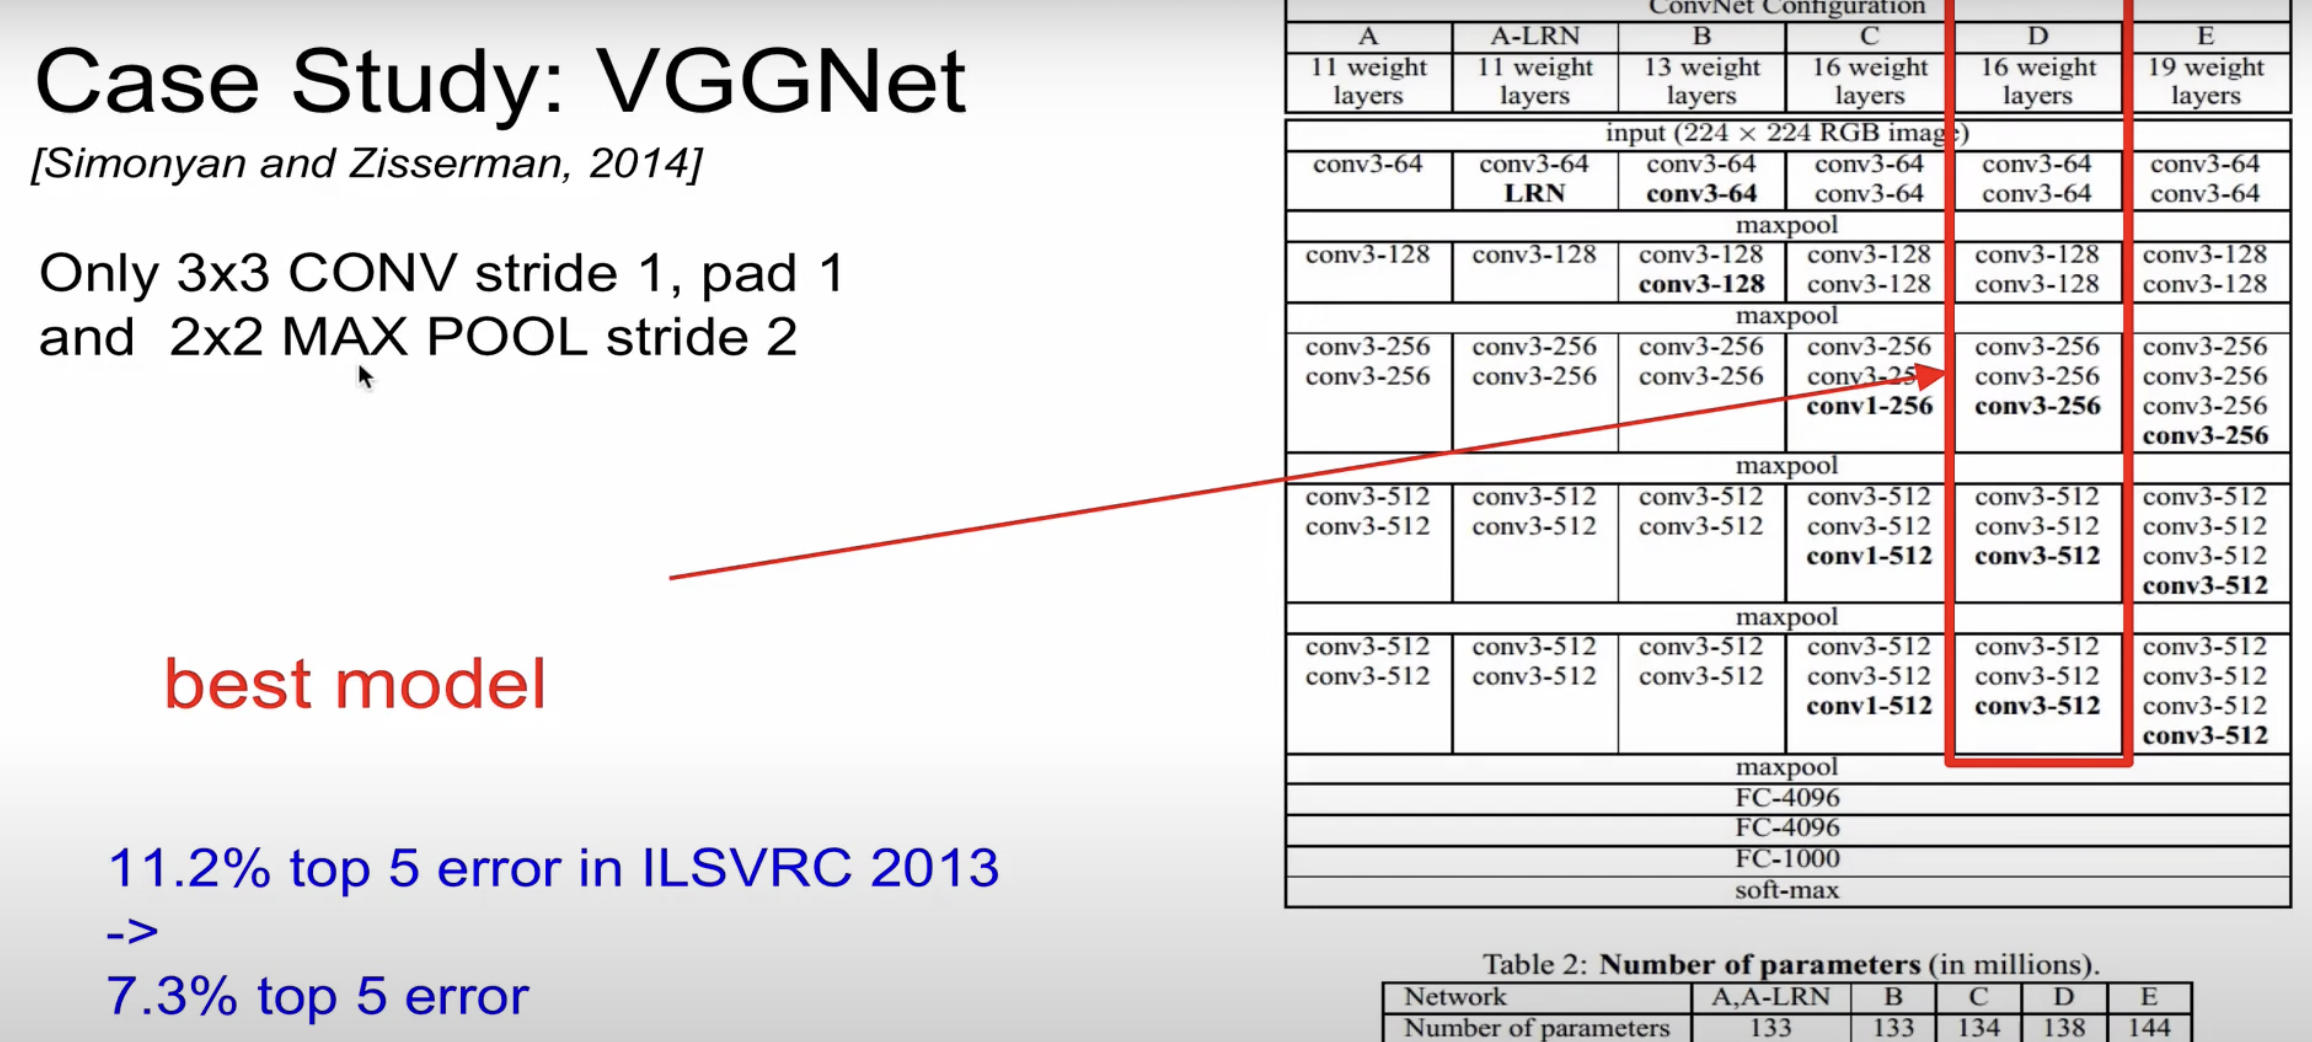
단순히 오직 CONV stride1, pad1 & 2x2 MAX POOL stride2 만 이용한다.
이처럼 단순한 구조로 모형을 깊게 쌓았음에도 불구하고 top5 error가 상당히 감소한 것을 알 수 있다.
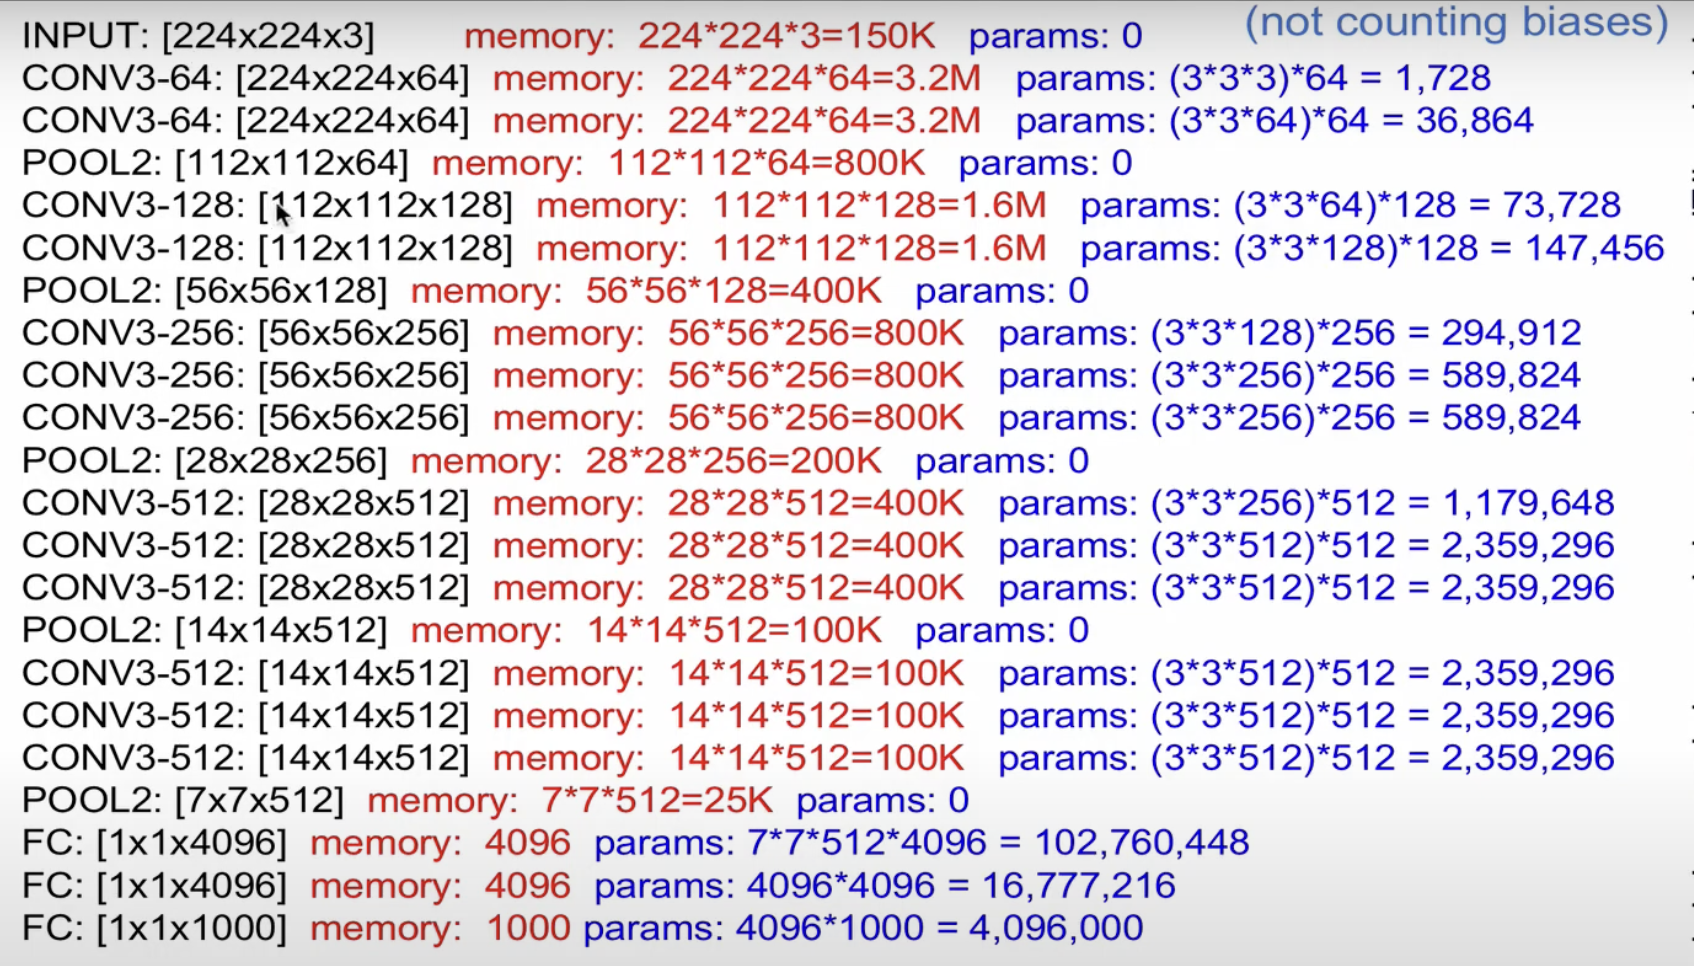
image size는 줄지만, filter의 수는 늘어나는 것을 볼 수 있다.
한 image당 약 200mb의 메모리를 사용한다.
parameter은 1억3800만
convolution layer의 weight를 합친 것보다, FC layer의 weight가 큰 것을 알 수 있다.
때문에 최근에는 FC layer를 사용하는 것이 비효율적이고, 대신에 average pooling을 이용하는 연구가 진행된다.
memory 사용량을 보면 대부분 앞(convolution)에서 할당되는 것을 볼 수 있다.
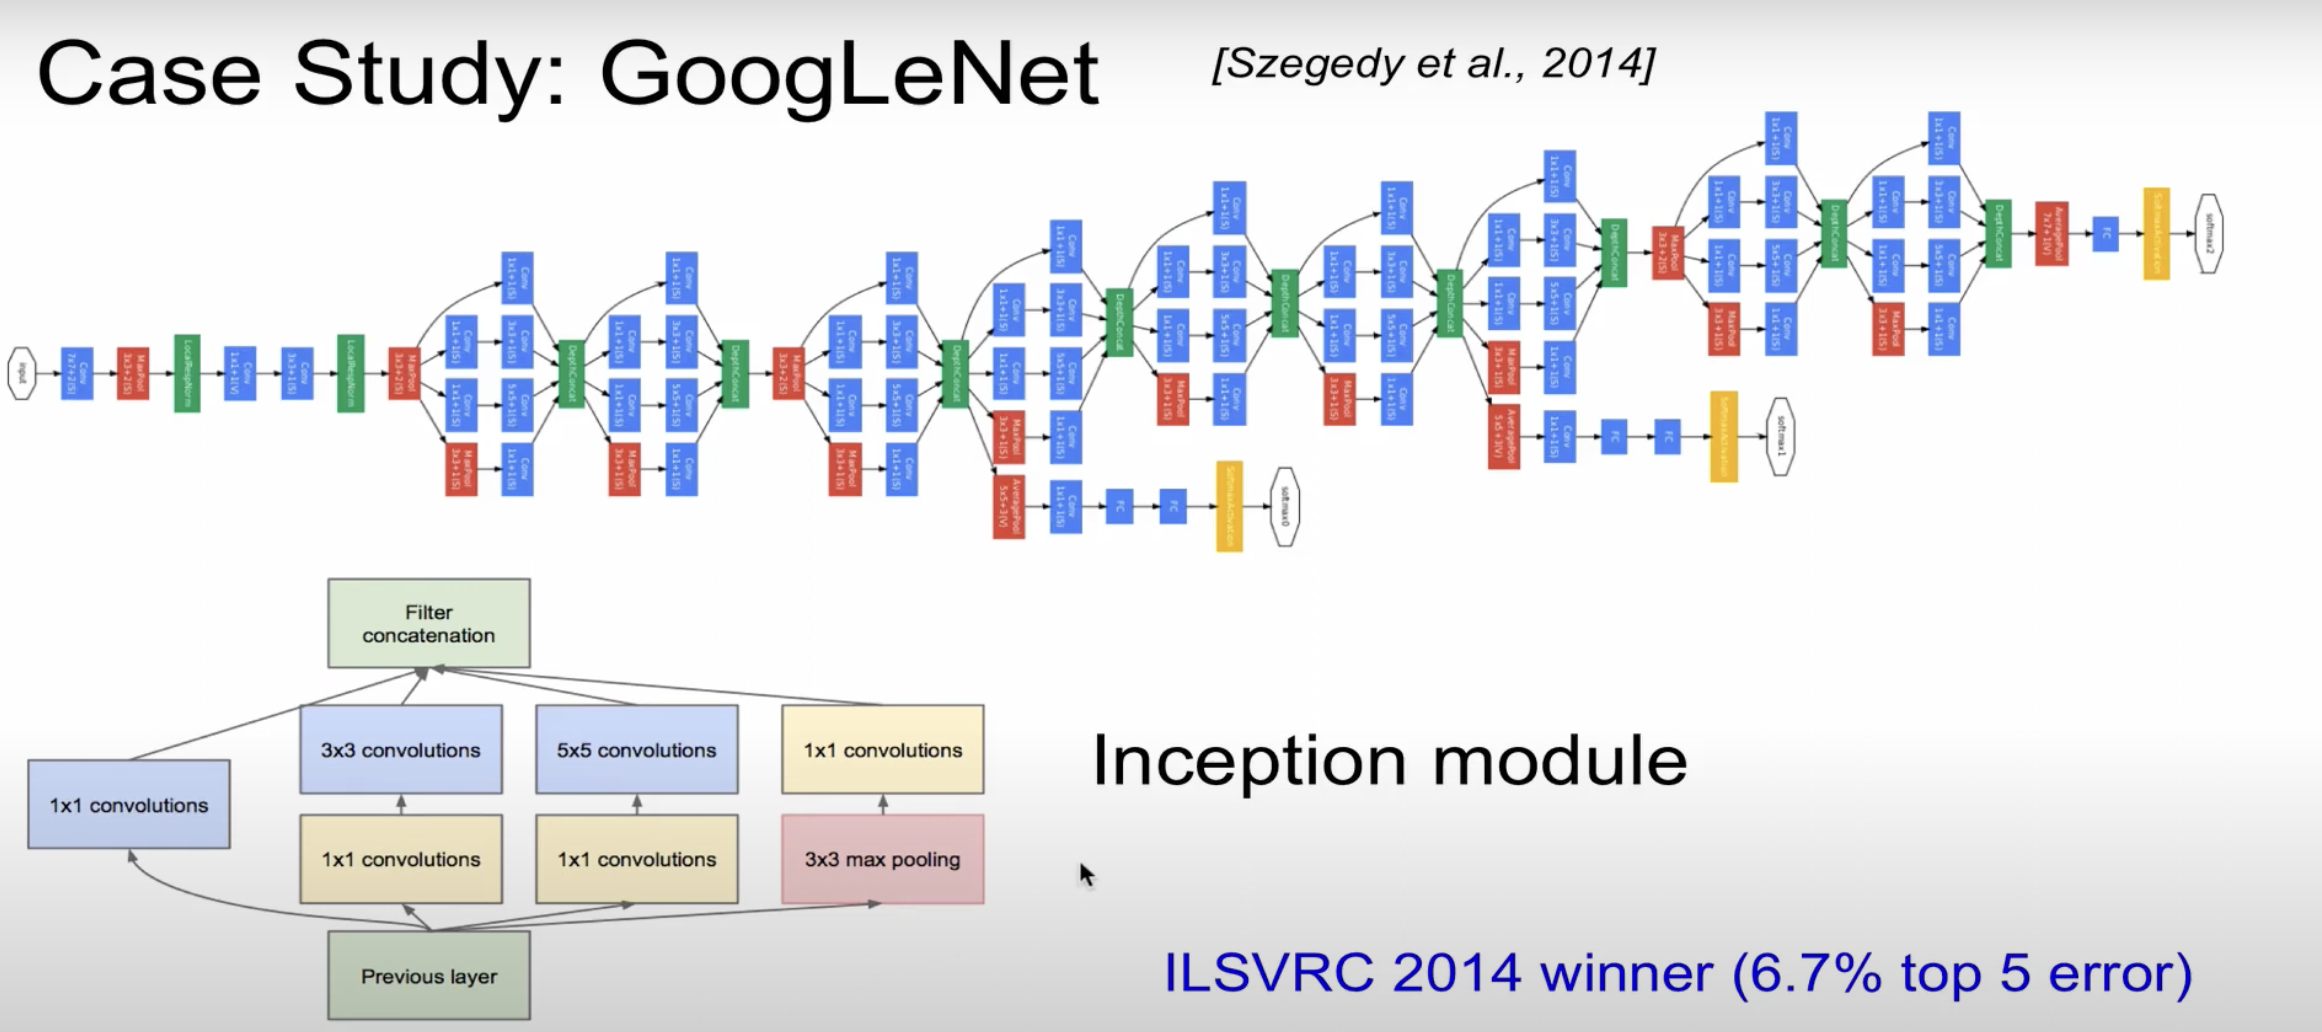
GoogLeNet을 보면 depth도 깊고 width도 넓은데 parameter는 적은 특징을 볼 수 있다.
GoogLeNet이 width가 넓어지는 곳을 Inception module이라고 하는데, Inception module이란 filter 연산을 비선형으로 연산한 것이다.
이러한 연산을 “Network in network”라고 하는데 이를 그림으로 표현하면 아래로 할 수 있다.

과거(a)에서 처럼 선형이 아닌 Mlpconv layer를 통해 비선형 연산을 진행한다.
이때 핵심적으로 등장하는 layer가 1x1 Convolution layer이다.
1x1 Convolution은 동일한 값을 가지면서 depth를 줄일 수 있는데, 이때문에 연산량을 줄일 수 있다.
depth를 줄여서 Dimensionality reduction이라고도 한다.
parameter을 상당히 줄여, AlexNet보다 12배 적은 파라미터를 가지고, 2배의 속도를 가지게 된다.
상당히 복잡한 모델이기때문에 1등을 했음에도 불구하고 2등이지만 간단한 VGGNet이 대중적으로 이용됐다.
- ResNet
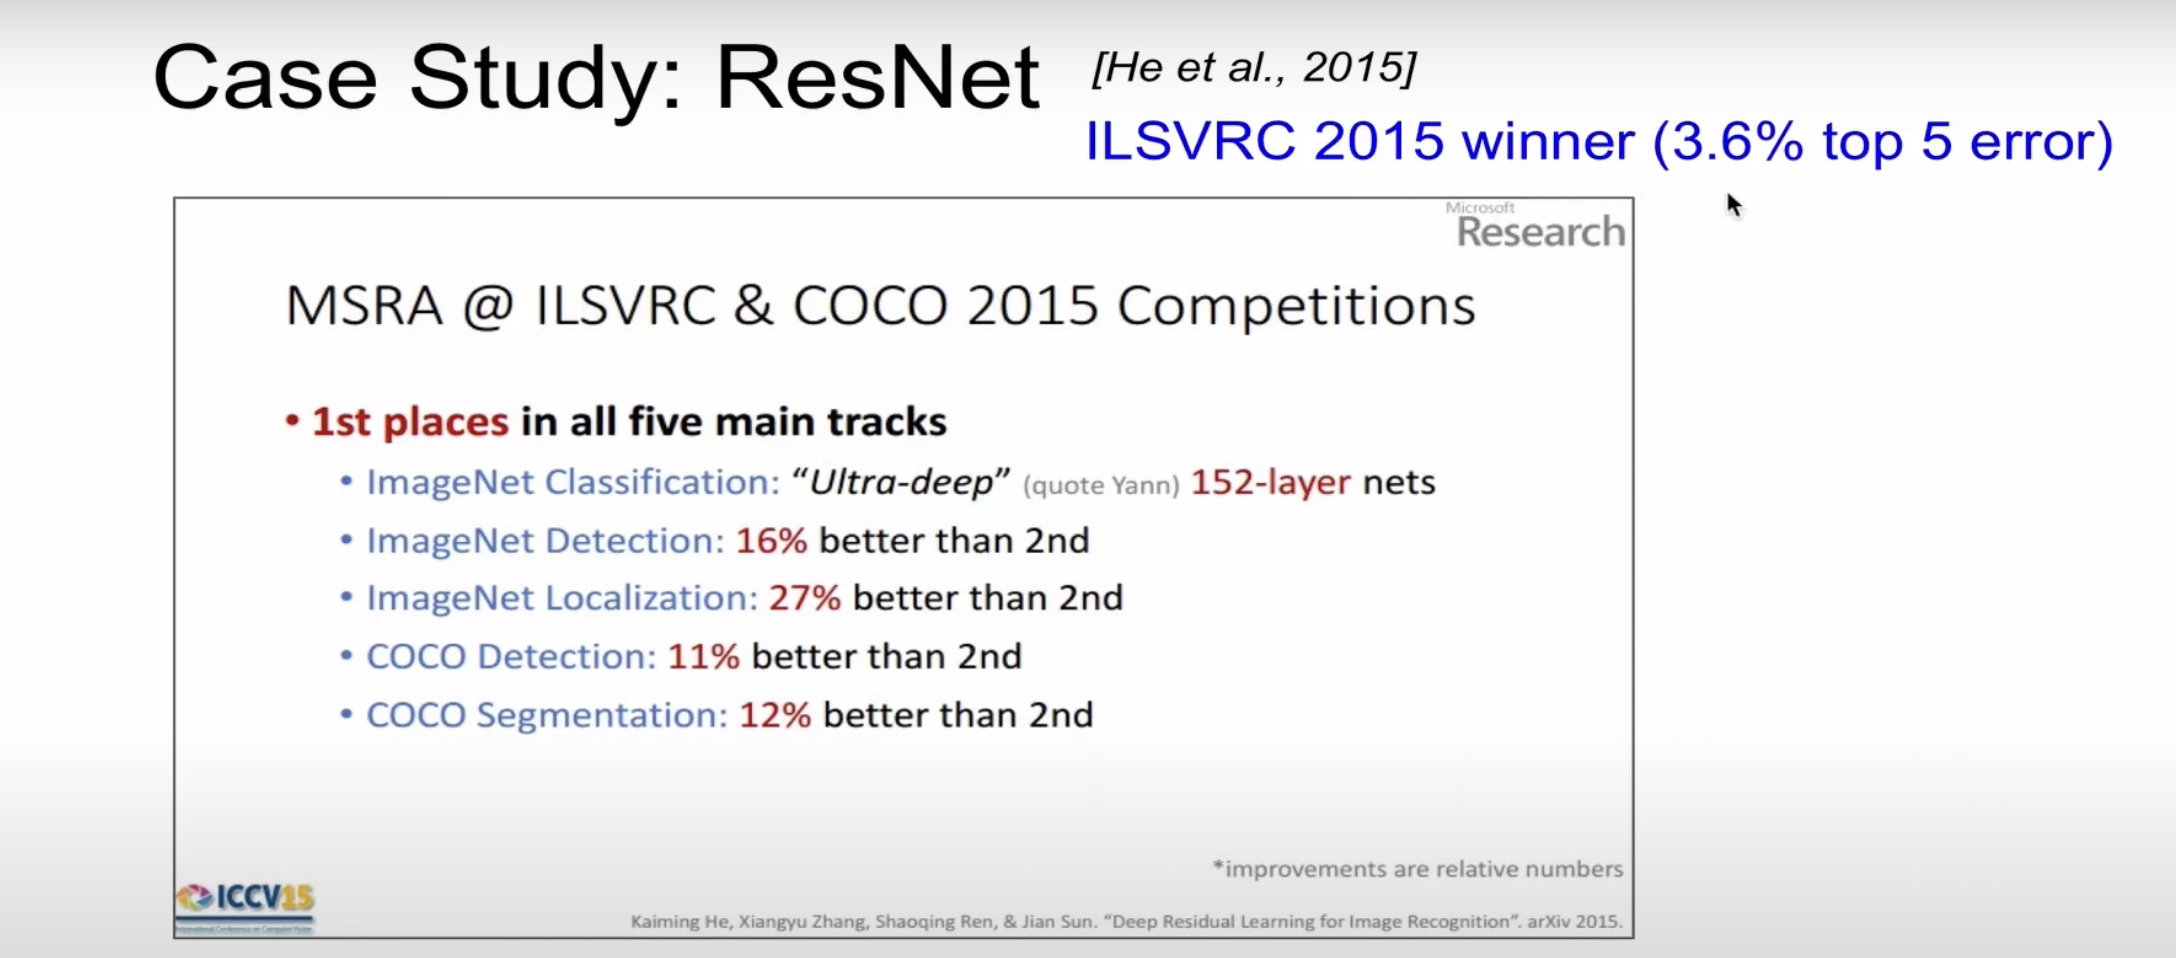
ImageNet Classification뿐만 아니라 모든 분야에서 석권을 하였다.
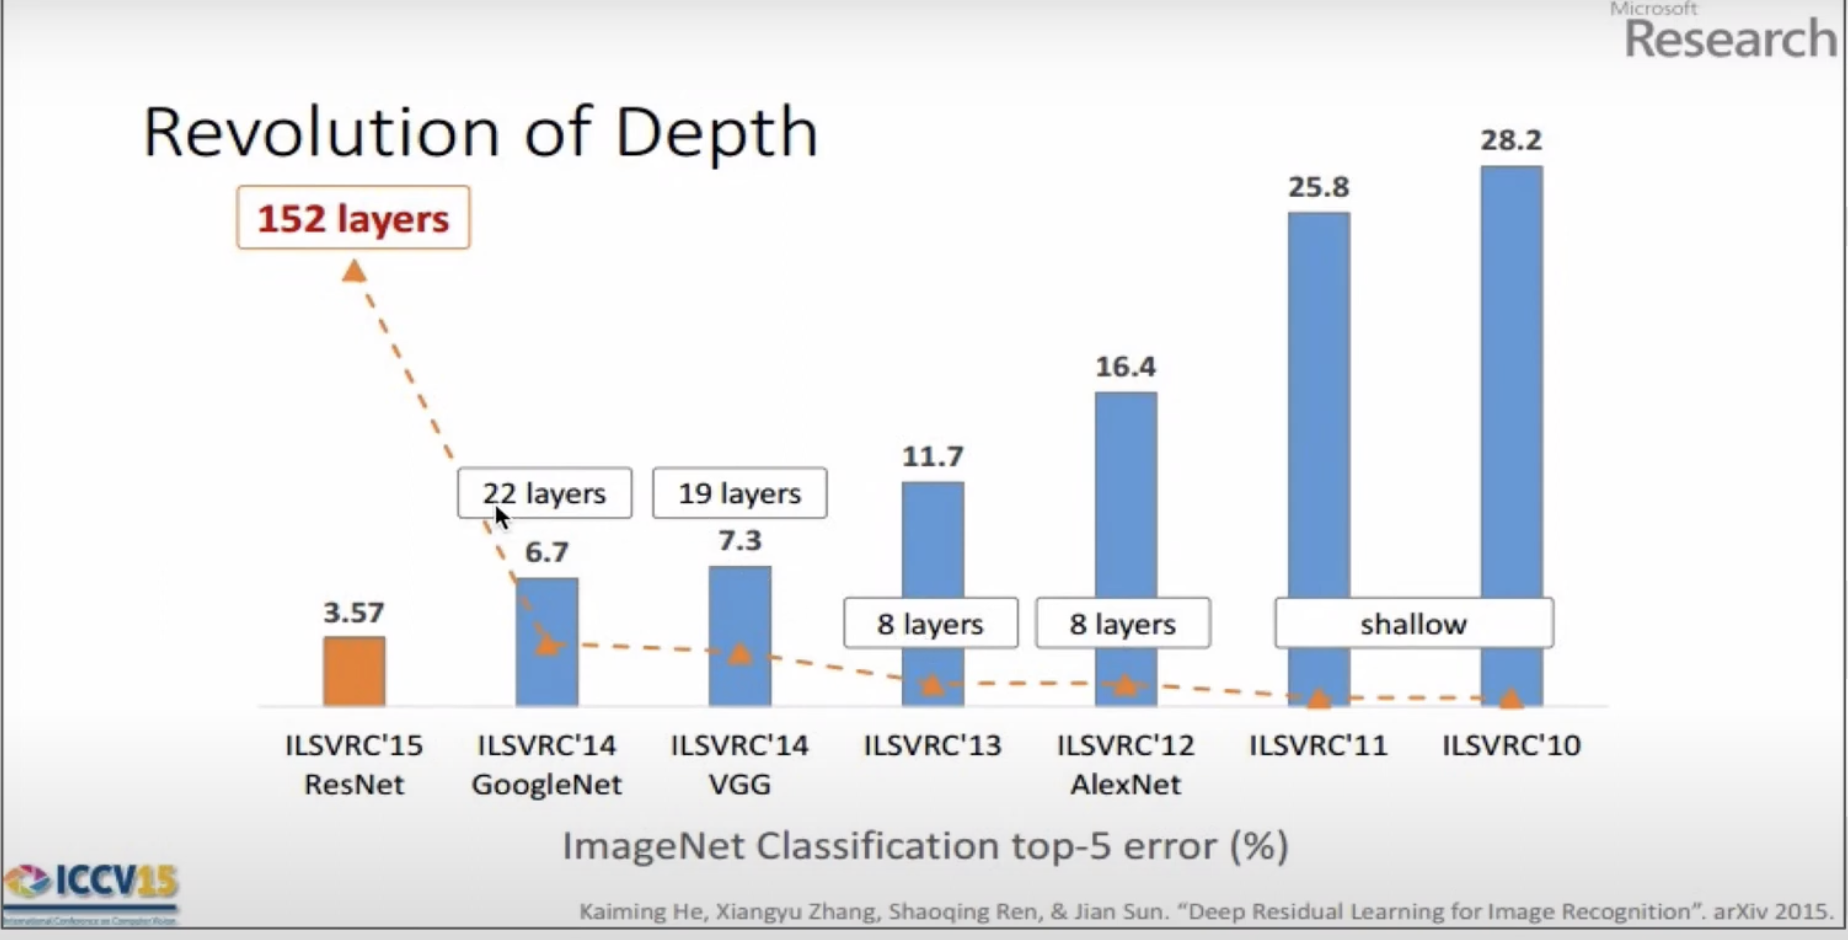

ResNet의 주장은 지금까지의 연구(plain net)는 layer가 많아짐에 따라 error rate가 증가한다.
이러한 문제를 Degeneration problem이라고 한다.
ResNet의 경우 layer가 증가함에 따라 error rate가 감소한다. 이는 skip connection 을 통해 Degeneration problem의 layer 개수가 늘어난 것을 알 수 있다.
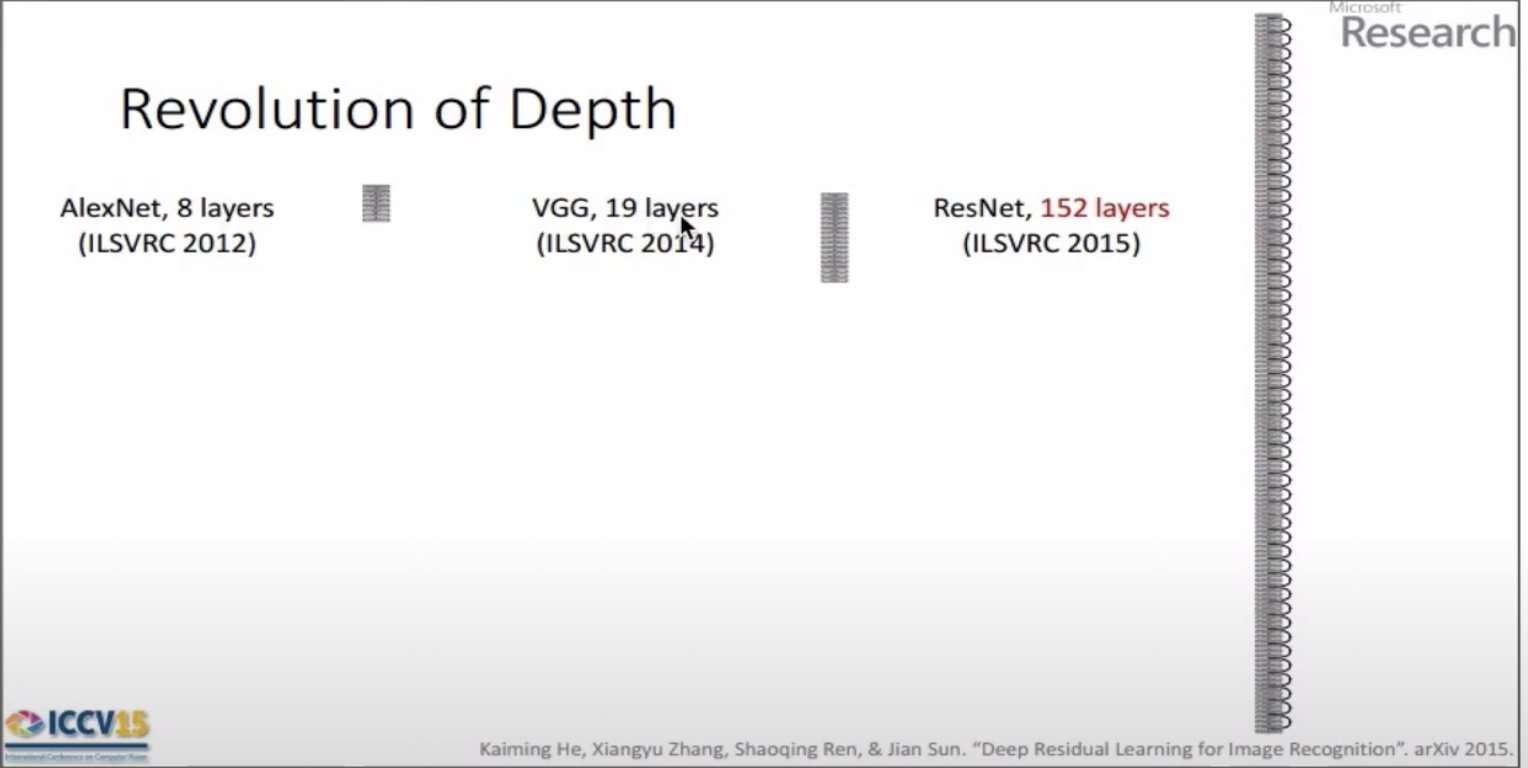
skip connection 을 통해 ResNet은 152개 layer를 사용할 수 있었다.
따라서 training 기간은 상당히 오래 걸리지만, test 시에는 상당히 빠른 결과를 냈다.(VGG보다 8배 이상 빠른 결과)
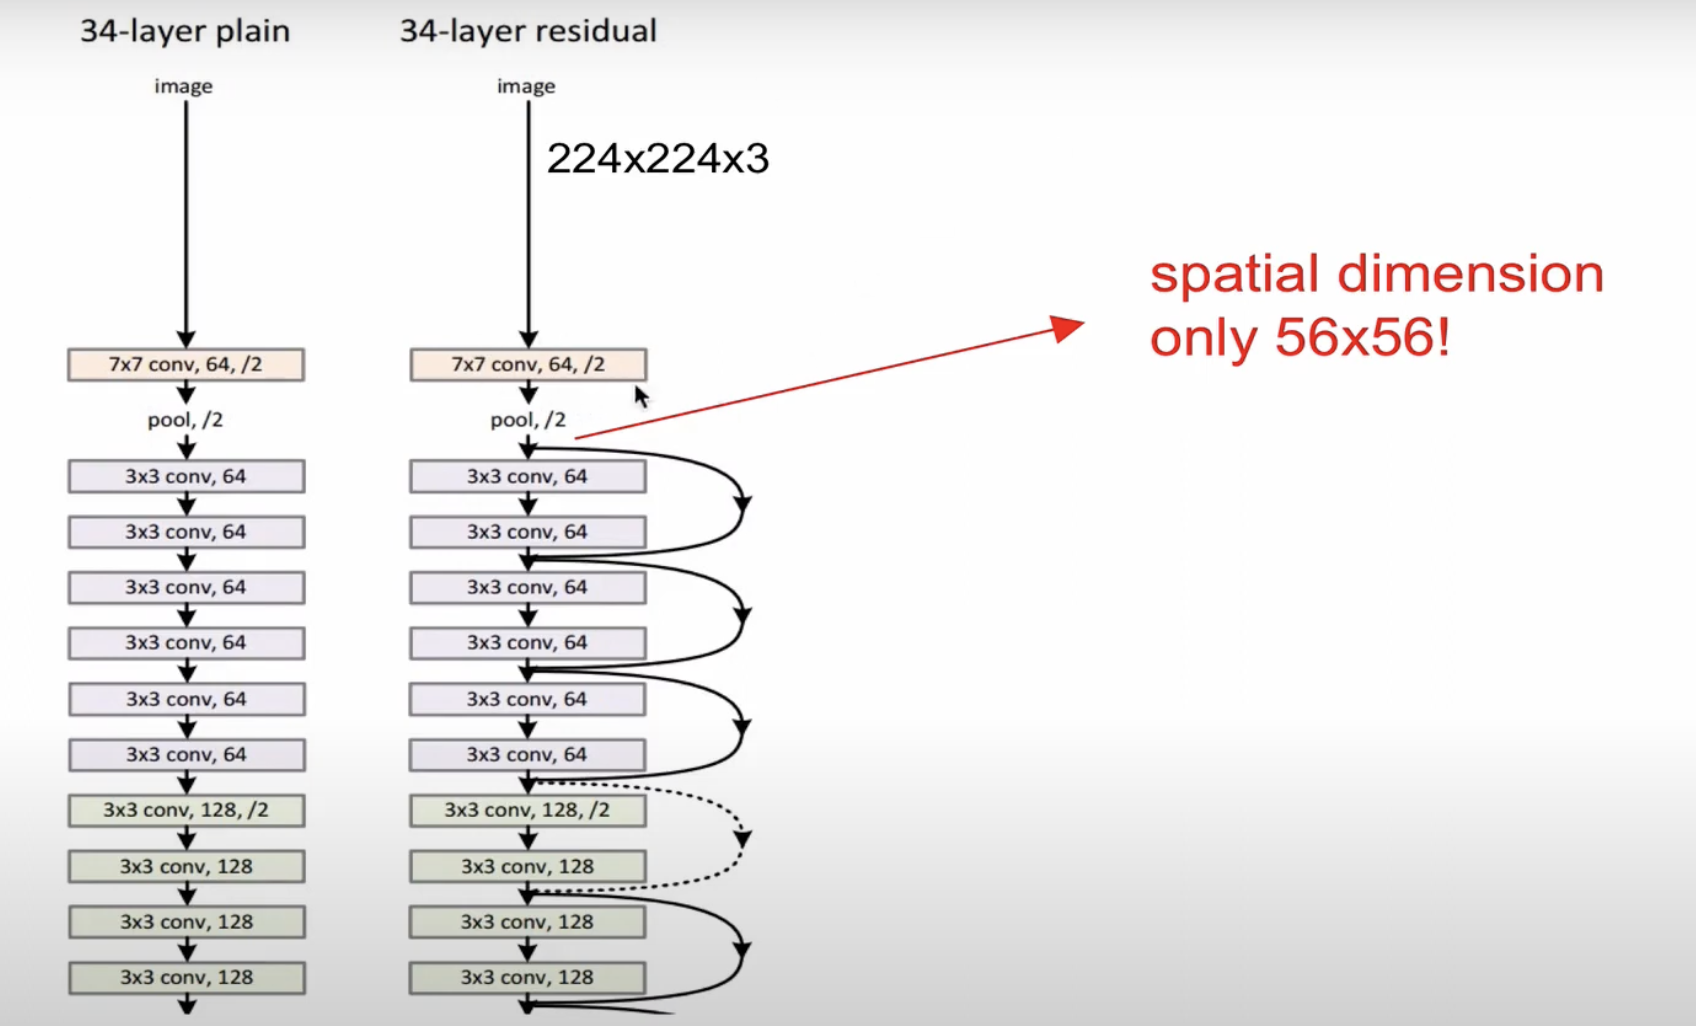
ResNet에서 주목해야하는 것 CONV layer를 한번 거친 후 바로 pooling이 들어가는데, 이후 layer에서 쭉 들어간다.
초기에 size를 줄이기때문에 매우 효율적이고, 이후 skip connection을 통해 효율적 연산이 이뤄진다.
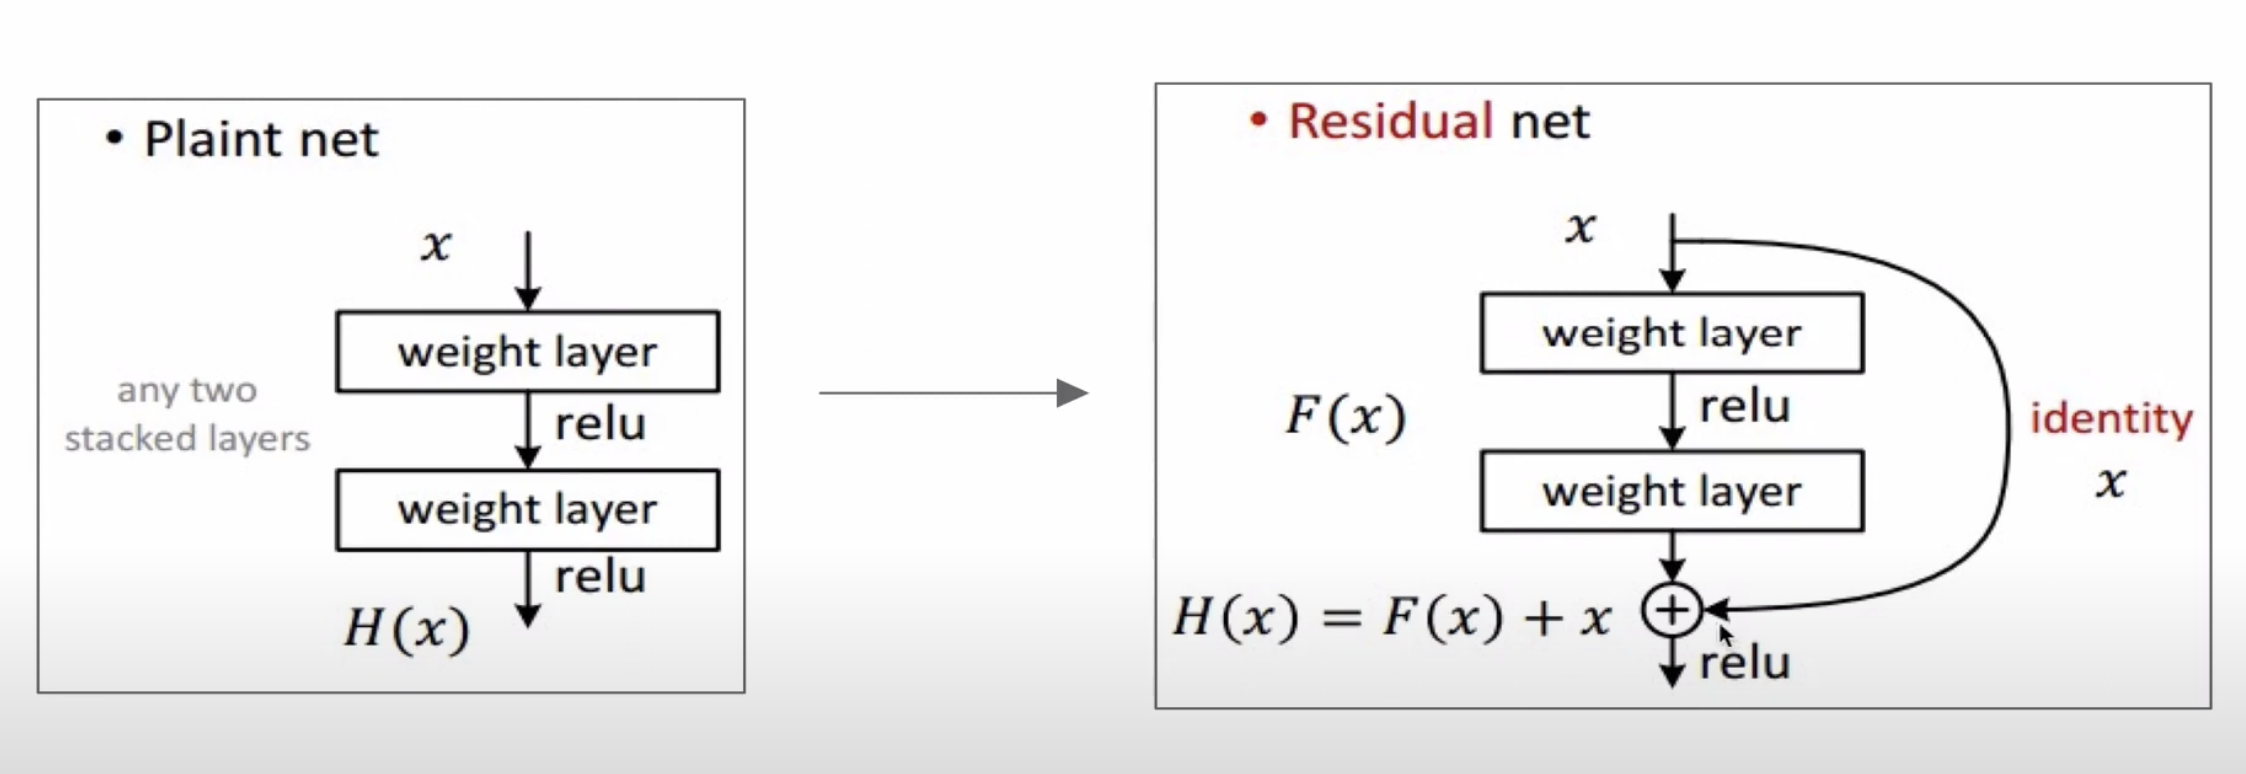
ResNet같은 경우에는 skip connection 이 있고 + 연산이 있는데,
backpropagation을 할 때 바로 이전의 CONV로(126개의 layer를 한번에 넘어가게) 갈 수 있다.
ResNet을 특정 모델이라고 생각하기 보다, 이러한 skip connection을 하는 concept로 이해하는 것이 좋다.
- 모든 CONV layer 이후 Batch Normalization을 사용한다.
- Xavier/2를 이용한다.
- AlexNet(0.01)보다 큰 learning rate(0.1)을 이용한다.
- Error 가 정체되면 10으로 나눈다.
아래는 개괄적인 ResNet의 코드이다.
import torch
import torch.nn as nn

def conv3x3(in_planes, out_planes, stride=1):
    # 3x3 합성곱 정의, 바이어스는 사용하지 않음
    return nn.Conv2d(in_planes, out_planes, kernel_size=3, stride=stride, padding=1, bias=False)

class BasicBlock(nn.Module):
    expansion = 1

    def __init__(self, inplanes, planes, stride=1, downsample=None):
        super(BasicBlock, self).__init__()
        # 첫 번째 합성곱
        self.conv1 = conv3x3(inplanes, planes, stride)
        self.bn1 = nn.BatchNorm2d(planes)
        self.relu = nn.ReLU(inplace=True)
        # 두 번째 합성곱
        self.conv2 = conv3x3(planes, planes)
        self.bn2 = nn.BatchNorm2d(planes)
        self.downsample = downsample
        self.stride = stride

    def forward(self, x):
        residual = x

        out = self.conv1(x)
        out = self.bn1(out)
        out = self.relu(out)

        out = self.conv2(out)
        out = self.bn2(out)

        # 잔차 연결
        if self.downsample is not None:
            residual = self.downsample(x)

        out += residual
        out = self.relu(out)

        return out

class ResNet(nn.Module):
    def __init__(self, block, layers, num_classes=1000):
        self.inplanes = 64
최근 트렌드는 작은 filter, 깊은 architecture을 사용한다.
POOL/FC layer를 이용하지않는 것이 추세다.
전통적인 architecture은 $([CONV - RELU)\times N - POOL?]\times M - (FC-RELU)\times, SOFTMAX$ 이지만, 최근은 이러한 architecture을 보이지않는다.